Introduction to HTML5 <canvas>
How to Build a Drivable Car in HTML5 and JavaScript

The release of HTML5 brought a myriad of changes to the web development community, but the canvas element, combined with some clever JavaScript, is what allows us to create complex and dynamic graphical content for the web. We will be focusing on it specifically to build a basic control system for a car in a top down browser based game.
So how does it work? Essentially, the canvas tag is the stage for all of your graphical content located in the markup. A series of methods in JavaScript were developed to manipulate the canvas. The canvas element is the only bit of markup needed for this project.
	<!DOCTYPE html>
	<html>
	   	<head>
	        <title>hello world</title>
	    	<meta charset="UTF-8">
	        <script type="text/javascript" src="main.js"></script>
	        <style type="text/css">
	            #canvas{
	            	border: 2px solid #333;
	            }
	        </style>
	    </head>
	    <body>
	        <canvas id="canvas" width"800" height="800">
	        	<!-- fun things happen here -->
	        </canvas>
	    </body>
	</html>
Next, we will look at how to actually draw some simple shapes and import images to the canvas using JavaScript! First thing we need to do is grab the canvas from the HTML document and then grab the "context" of the element. The context controls how the canvas element displays graphics. Contexts can be 2D or 3D, but we will be focusing on 2D for our top down game controls. Now let's draw some basic shapes!
	window.onload = function()
	{
	    var canvas = document.getElementById("canvas");
	    var context = canvas.getContext("2d");

	    context.fillStyle = "rgb(100, 200, 120)";
	    context.fillRect(10, 10, 55, 50);
	}
So let's go over what's actually happening here step by step.
The process of importing an image is a bit different because we are not actually drawing it using JavaScript.
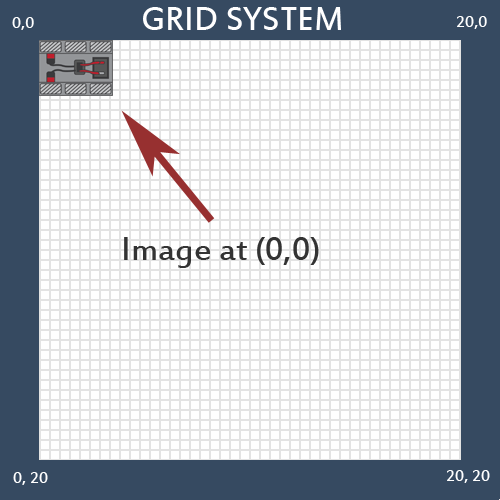
When the car is drawn using the drawImage() method, it will be drawn at coordinate 0,0 by the top left corner of the image.
So your code should now look like this. You can grab a copy of the car image here.
	window.onload = function()
	{
	    var canvas = document.getElementById("canvas");
	    var context = canvas.getContext("2d");

	    var x = 0;
	    var y = 0;

	    var car = new Image();
	    car.src="myimage.jpg";
	    context.drawImage(car, x, y);
	}
Canvas handles movement much like traditional animation does in cartoons. Think of the canvas tag like a flipbook. Each time you draw something using the context of canvas, you are drawing in a single page in a flipbook. So how do we program a flipbook?
So how do we start a new page? We use this.
context.clearRect(0, 0, 800, 800);
This will clear anything drawn in that particular section of the canvas. We will use this to simulate starting on a new blank page.
For step three, we need to indefinitely loop through our statements while making changes with each iteration. However, like a flipbook, we need to add a factor of time to the equation. If we just loop through, the canvas will only display our final result, but we want each change to display incrementally with a small delay. Think about when you flip through a flipbook. Each new page is revealed a fraction of a second apart from each other. We can simulate this in JavaScript with the setInterval method. Your code should now look like this (We are taking this moment to split up the drawing).
	window.onload = function()
	{
		x = 0;
		y = 0;

		canvas = document.getElementById("canvas");
		context = canvas.getContext("2d");

		var moveInterval = setInterval(function()
		{
			draw();
		}, 30);
	};

	function draw()
	{
		context.clearRect(0, 0, 800, 800);
		var car = new Image();
		car.src="myimage.png";
		context.drawImage(car, x, y);

		y++;
	}
We can stop the animation by passing the interval id returned by setInterval into the clearInterval function.
clearInterval(moveInterval);
Apart from the use of setInterval, HTML5 also provides a JavaScript API called requestAnimationFrame for working with animations with the canvas tag. It has the benefit of optimizing some of the animation features of the canvas tag and can stop animations from running in tabs that are not visible. We will not be using it for this tutorial as it's not cross browser compatible and requires knowledge of callback functions and recursion. However, if you are interested in learning more about it, you can go to this page on requestAnimationFrame to learn more about the requestAnimationFrame API.
If you have had a high school math course, you may recognize these letters. They represent SINE, COSINE, and TANGENT. They are used to in calculating the angles and lengths of triangles. How will we use this? Well consider the movement of our car as described in the diagram below.
Because the car is moving at an angle, the rates at which x and y increment are different. We calculate these differences using the SINE and COSINE functions in JavaScript. We need to multiply our angle by Math.PI/180 to convert it to radians, another way to represent angles in math. We need to do this because the rotate method we will be using soon requires an angle in the form of radians. If we don't have the angle formats match, neither will the car's new position and new angle.
	window.onload = function()
	{
		x = 0;
		y = 0;
		speed = 5;
		angle = 30;

		canvas = document.getElementById("canvas");
		context = canvas.getContext("2d");

		car = new Image();
		car.src="myimage.png";

		var moveInterval = setInterval(function()
		{
			draw();
		}, 30);
	};

	function draw()
	{
		context.clearRect(0, 0, 800, 800);

		context.drawImage(car, x, y);

		x += speed * Math.cos(Math.PI/180 * angle);
		y += speed * Math.sin(Math.PI/180 * angle);
	}
Now we need to make our car rotate. Lucky for us, the Canvas API includes a rotate method! The rotate method, like our drawImage method, does not rotate the object around its center, but at the left corner of the object. This means we need to make a very small adjustment to our movement statements as well as implementing the rotate method.
	window.onload = function()
	{
		x = 0;
		y = 0;
		speed = 5;
		angle =25;

		canvas = document.getElementById("canvas");
		context = canvas.getContext("2d");
		car = new Image();
	    	car.src="myimage.png";

		var moveInterval = setInterval(function()
		{
			draw();
		}, 30);
	};

	function draw()
	{
		context = canvas.getContext("2d");
		context.clearRect(0, 0, 800, 800);

		x += speed * Math.cos(Math.PI/180 * angle);
		y += speed * Math.sin(Math.PI/180 * angle);

		context.save();
		context.translate(x, y);
		context.rotate(Math.PI/180 * angle);
		context.drawImage(car, -(car.width/2), -(car.height/2));
		context.restore();
	}
We now have a car which can move and rotate over a period of time. Next we will tie these movements to our keyboard so that we may control our car!
In making our car move, we need to identify what exactly we will be changing with each keystroke. For our controls we will make use of the WSAD keys. The numerical values for them, also known as key codes, are as such.
	window.onload = function()
	{
		x = 0;
		y = 0;
		speed = 5;
		angle = 0;
		mod = 0;

		canvas = document.getElementById("canvas");
		context = canvas.getContext("2d");
		car = new Image();
	    	car.src="myimage.png";

	    	window.addEventListener("keydown", keypress_handler, false);
	    	window.addEventListener("keyup", keyup_handler, false);

		var moveInterval = setInterval(function()
		{
			draw();
		}, 30);
	};

	function draw()
	{
		context = canvas.getContext("2d");
		context.clearRect(0, 0, 800, 800);

		context.fillStyle = "rgb(200, 100, 220)";
		context.fillRect(50, 50, 100, 100);

		x += (speed*mod) * Math.cos(Math.PI/180 * angle);
		y += (speed*mod) * Math.sin(Math.PI/180 * angle);

		context.save();
		context.translate(x, y);
		context.rotate(Math.PI/180 * angle);
		context.drawImage(car, -(car.width/2), -(car.height/2));
		context.restore();
	}

	function keyup_handler(event)
	{
		if(event.keyCode == 87 || event.keyCode == 83)
		{
			mod = 0;
		}
	}

	function keypress_handler(event)
	{
		console.log(event.keyCode);
		if(event.keyCode == 87)
		{
			mod = 1;
		}
		if(event.keyCode == 83)
		{
			mod = -1;
		}
		if(event.keyCode == 65)
		{
			angle -= 5;
		}
		if(event.keyCode == 68)
		{
			angle += 5;
		}
	}
Well there you have it. We now have a working controllable car built in HTML5.
For further reading, I would suggest to researching JavaScript design patterns and object oriented programming. This will allow you to support several cars at once and manage more complex code that comes in writing larger HTML5 applications.