Image Map Requests
An image map is… well, an image. But one that has multiple “hotspots” that can be clicked and linked to different URLs! They are most often used to provide individuality to a course. Think of them as a (perhaps unnecessarily) fancy list of commonly used links like “Syllabus,” “Start Here,” “Schedule,” etc that you might see on the front page of your Webcourse.
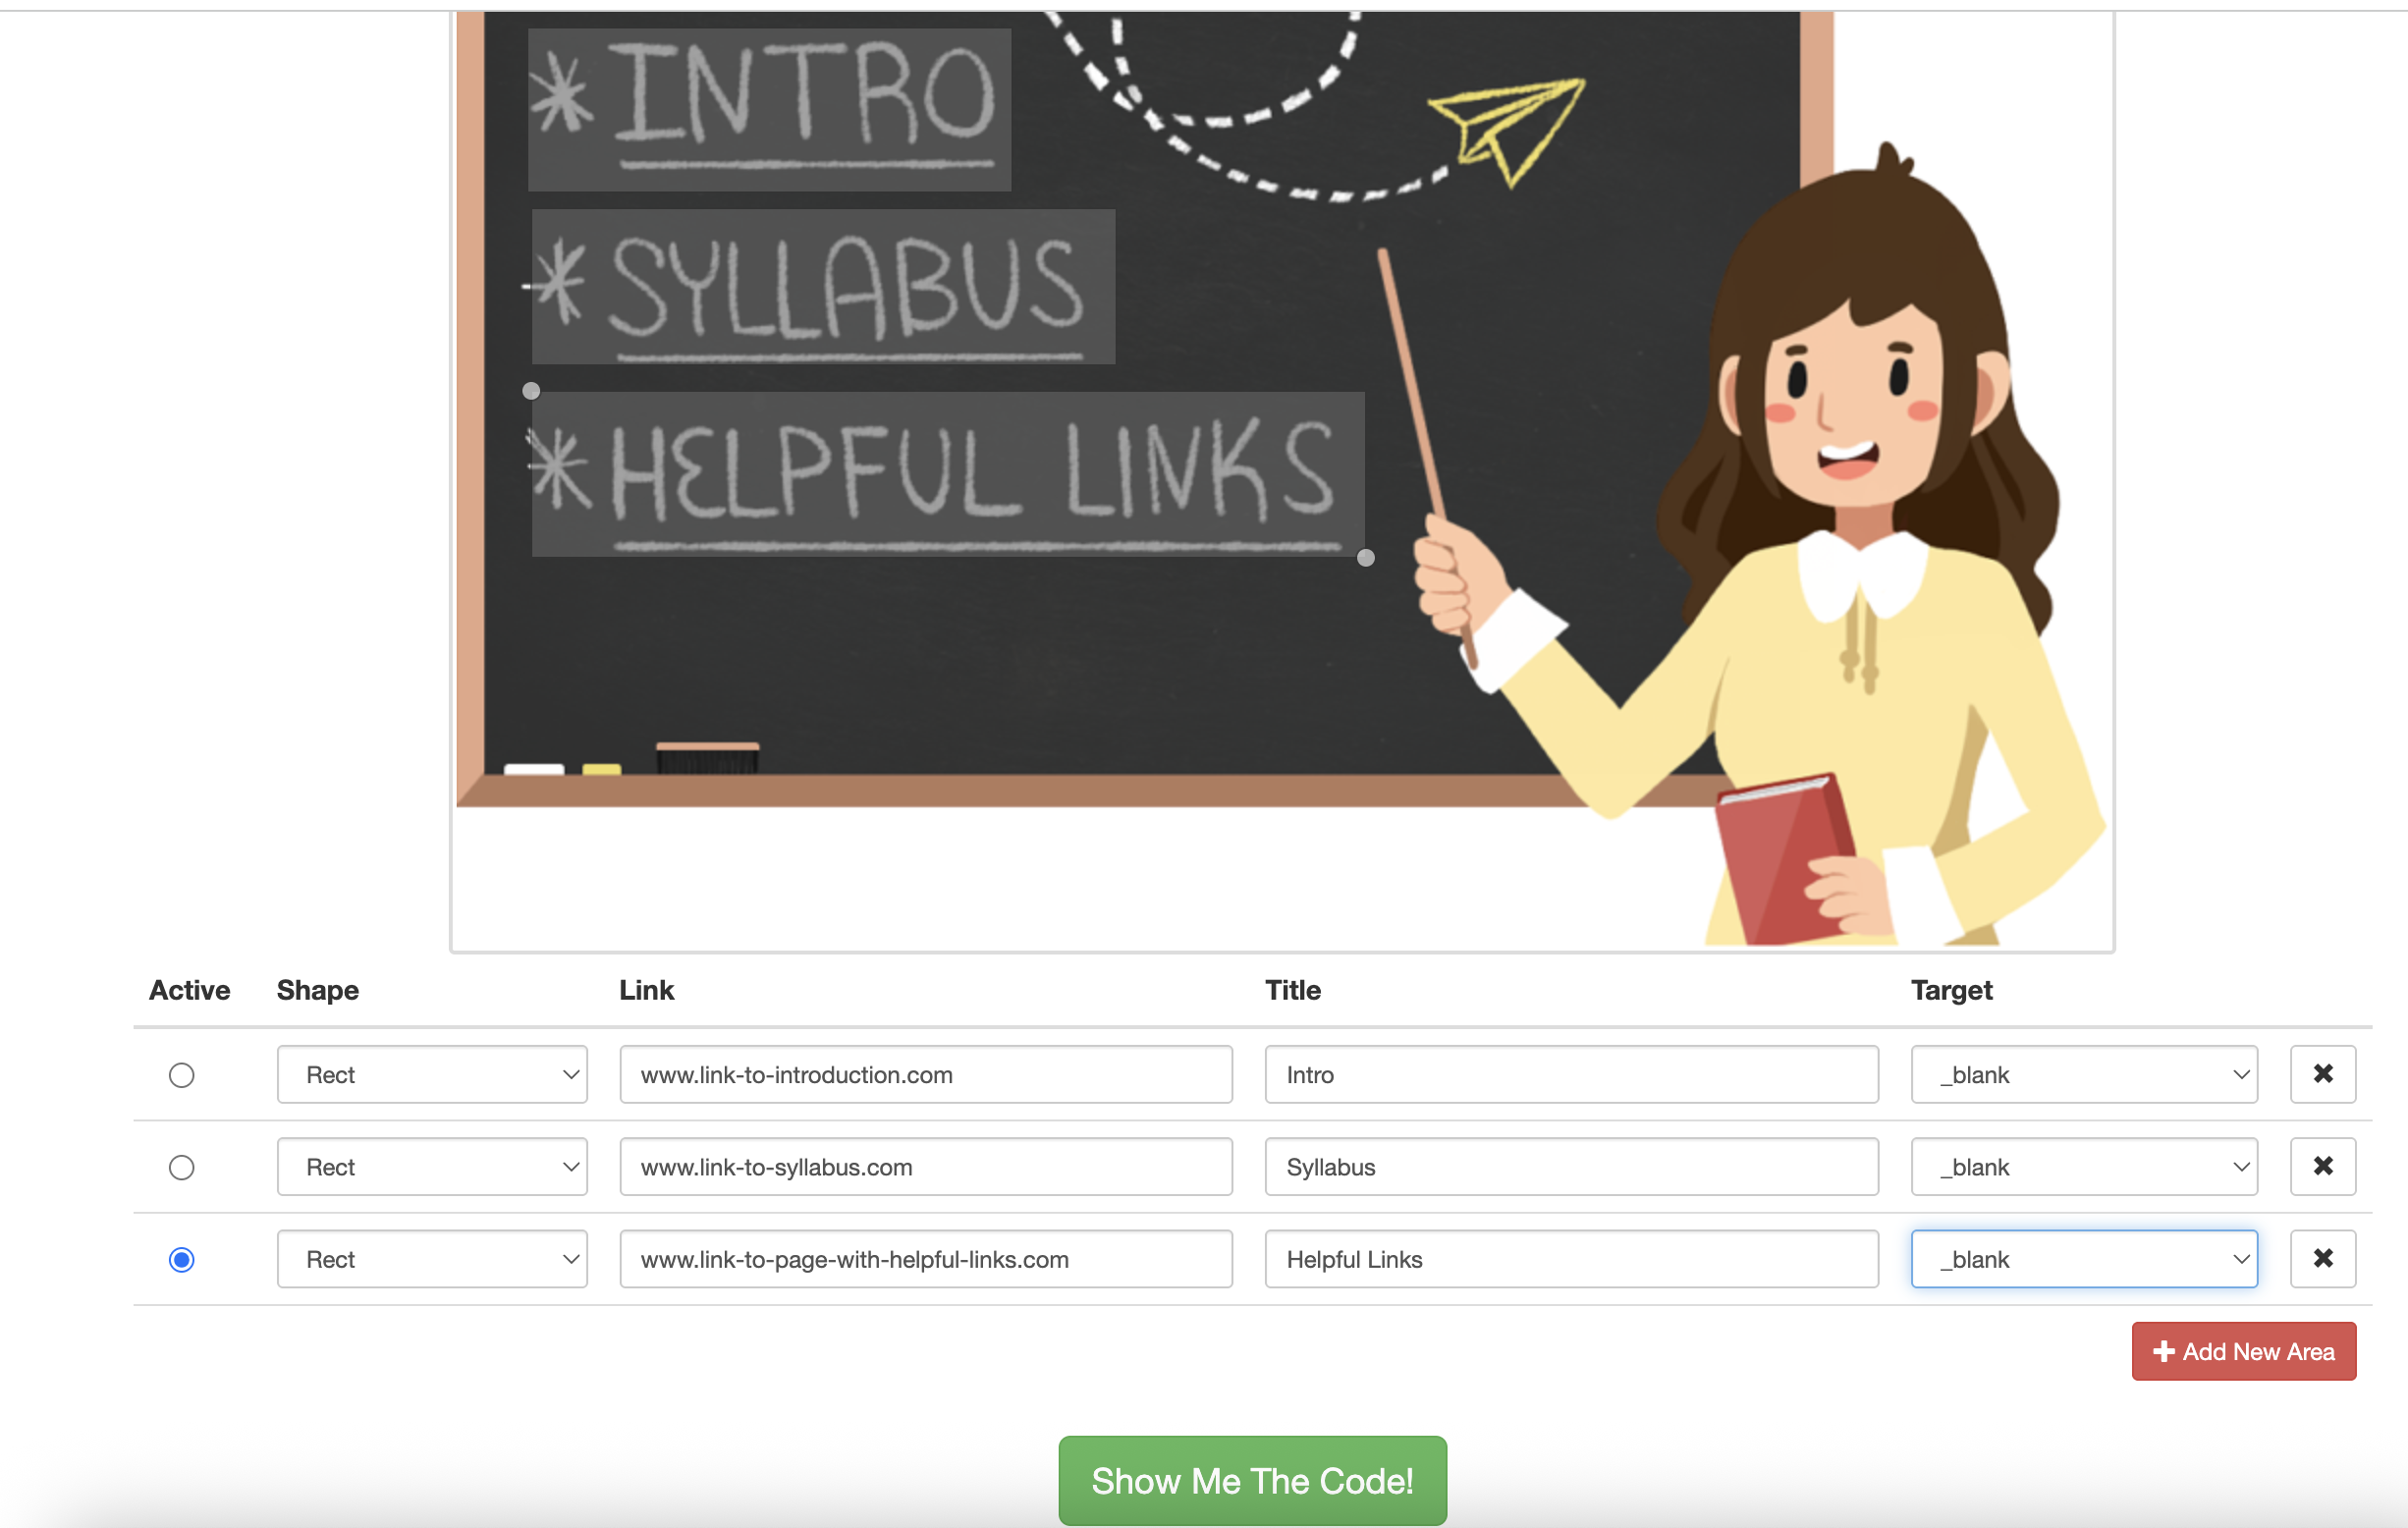
They can also be used to illustrate a learning concept, such as a world map with links to information about each country/region, or an anatomical model that has hotspots labelled over key parts of the body. Here’s one example of an image map where the “Intro,” “Syllabus,” and “Helpful Links” text would be clickable and lead to new pages:

Note: Usage of image maps in Webcourses is currently under review by the Instructional Design Director as of March 2026. As such, support may stop for this ticket in the near future, but for now we will continue working on incoming tickets as normal.
How to Complete The Request
Creating the Image Map
First, check the description/comments to find out if the request is to create a new image map or to edit an existing one. Sometimes the faculty just want the links updated with no changes to the image. In that case, simply go to the HTML of the page where the image map is on, and edit the links as needed. If the ticket does request changes to an existing image, then continue to follow the steps below as the image map will need to be re-generated.
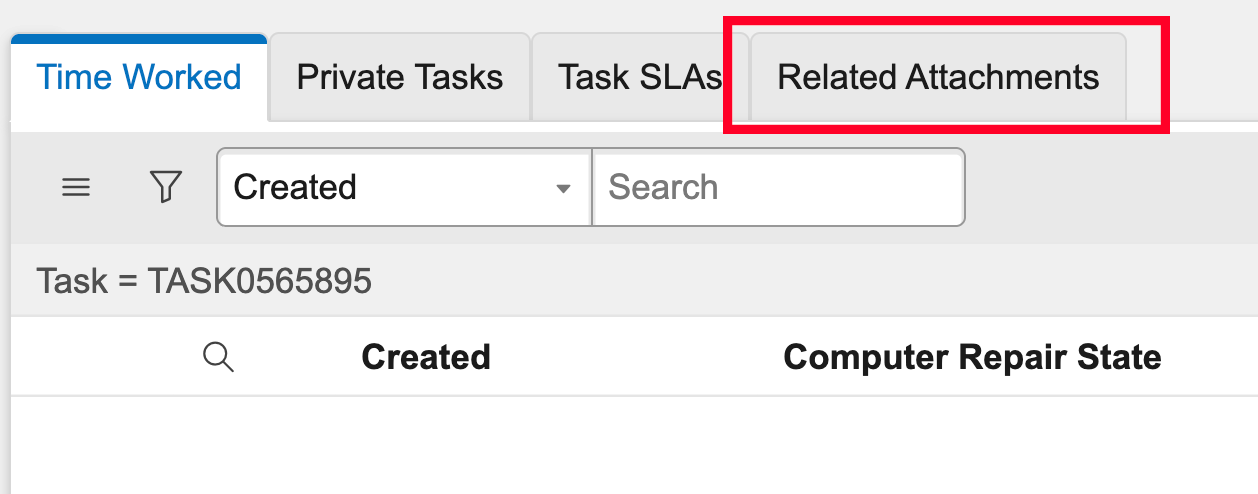
To create a new image map, download the given image. This should be uploaded somewhere to the ticket itself. You’ll have to go to the very bottom of the ticket to check the “Related Attachments” tab, not the attachments icon at the top of the ticket. If it’s not there, check the comments and ticket description again. Otherwise, leave an Additional comment (Customer visible) asking for the image.
Once downloaded, check the image size. Because image maps cannot be auto-resized on a Canvas page in response to the browser window (as this will mess up the coordinates of the hotspots) we need to give each map a fixed width. It should be no larger than 1000px wide at most, but ideally between 600 and 800px. It all depends on how the image and, more importantly, the text inside the image looks when scaled to these sizes. It’s a bit subjective, but just make sure everything is readable.
You can use any image editor you prefer to resize it. Photoshop is provided on each machine; check Self Service if you don’t have it installed.
Save the new image as the original file name plus the new resolution. For example, if the file was called “courseMap-Image” and you resized it to 800px width, then you would rename this file “courseMap-Image_800px”.
Next, go to this cool free Image Map Generator and upload the image.
The website is very simple and easy to use. Select a shape from the drop-down menu based on what the shape of the text/object in the image map is. Go in logical order through the map. For instance, if the map contains modules, start with Module One, then Two, and so on.
Based on the example at the top of this page for reference, we’re dealing with a list of text, so we will use the Rect shape. Clicking on the image will place a vertex; clicking again will place another. You can drag the vertices around or delete them by right clicking. Rect and Circle have 2 vertices, while Poly will have as many as you place. The “Link” section should have whatever link the ticket creator provided in the ticket for that hotspot (or a link to the Syllabus if the text in the map says “Syllabus”, etc). “Title” should be whatever the text in the image is, or the title of the page it links to if there is no text. “Target” should always be set to _blank so it opens on a new tab.
If there is an object directly beside/associated with text in the graphic, such as a space ship above each “Module 1,” “Module 2,” etc text, be sure to encapsulate both the text AND the graphic.
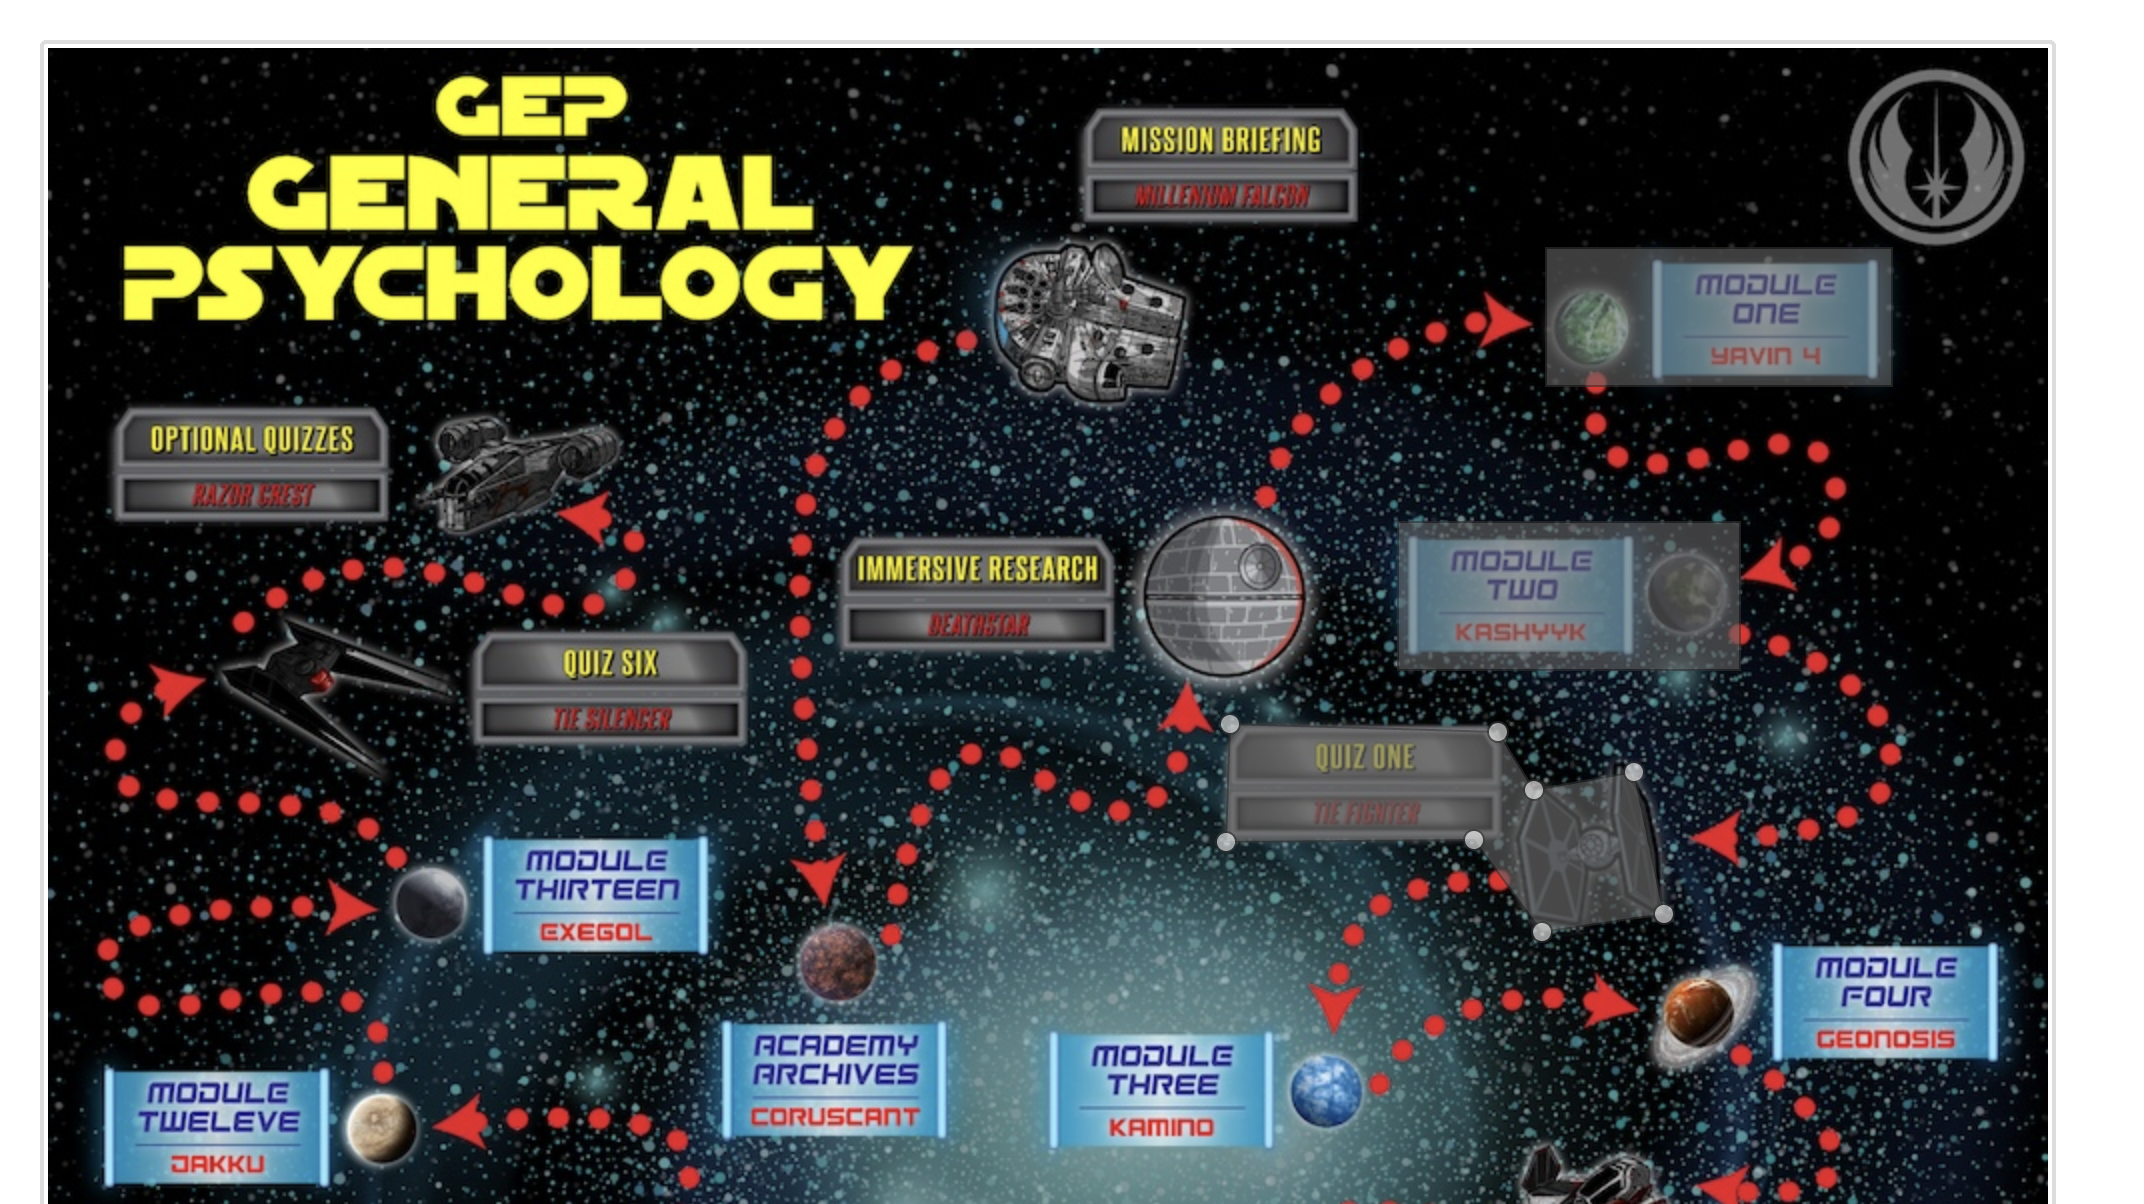
Here’s a definitely not copyright-infringing example. Notice how the Module One text box as well as the planet graphic beside it is included in the hotspot region. Change shapes as needed between Rect, Circle, and Poly. Try to be as concise as possible when outlining the hotspots. Don’t let nearby regions be too close to one another and definitely don’t let them overlap.
When you complete one link, click on “Add New Area.” Make sure to click the radio button next to the new row before continuing, or else it will edit the previous one.
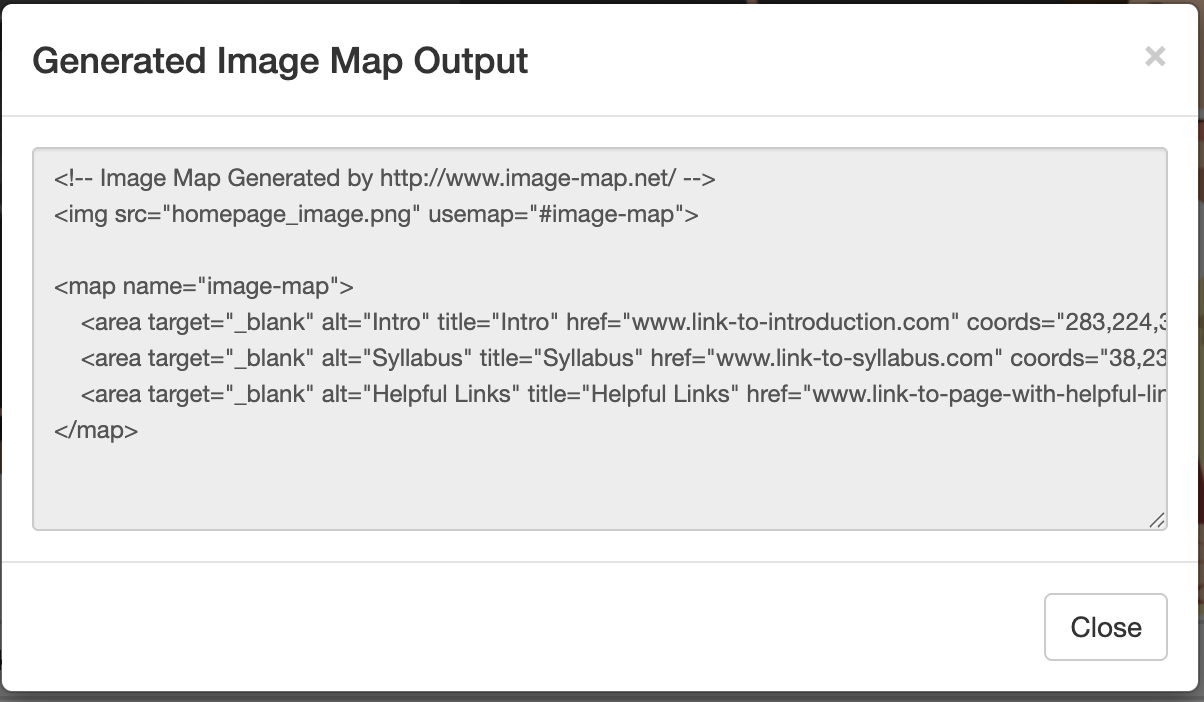
When you’re done with everything, click the “Show Me The Code!” button at the bottom. Copy-paste everything from the popup.
Putting the Image Map on Webcourses
Now you’re ready to plug it into Webcourses! First, navigate to the Files section of the course. If there’s not a folder called something like “image-map” already, create one. Put your image in that folder. Make sure it’s the same one you just used on the Image Map Generator site.
Go to the Canvas page they requested the image map to be on and then paste the code from the generator into the HTML editor. Replace the img src with the image you just uploaded. The img src URL should follow this format:
https://webcourses.ucf.edu/courses/[COURSE ID]/files/[FILE ID]/preview
Otherwise, if you copy-paste the URL directly from the files page, sometimes it will automatically download the image when viewing the page. Add a minimum width to the img element, where the number “800” is the exact width of the image:
min-width: 800px!important
Alternate Links
While an image map is fully keyboard and screen-reader accessible, they can be cumbersome on mobile devices due to the fixed size. Plus, any issues with images not loading will potentially cause display issues. So we want to provide an accordion tab below the image map with a list of the links so anyone can access the same information. Copy-paste this snippet into the HTML editor just under the image map code and edit the bulleted list of links appropriately:
<div class="css-accordion">
    <details>
        <summary>Alternate List of Links for Image Map</summary>
    </details>
    <div class="css-accordion-content">
        <div class="css-accordion-hint" style="font-size: .8em; color: #595959;" aria-hidden="true"><i>--- Accordion tab content begins here. You may edit or insert additional content using the normal editor. ---</i></div>
        <ul>
            <li><a href="LINK HERE" target="_blank">LINK TEXT</a></li>
            <li><a href="LINK HERE" target="_blank">LINK TEXT</a></li>
            <li><a href="LINK HERE" target="_blank">LINK TEXT</a></li>
        </ul>
        <div class="css-accordion-hint" style="font-size: .8em; color: #595959;" aria-hidden="true"><i>--- Accordion tab content ends here. --- </i></div>
    </div>
</div>
This is a fairly new process, however, as previously we used CSS to hide content entirely on mobile. So if you’re updating an existing image map that does not have this accordion snippet, please add it.
Once you’re done, test it out to make sure all the links work in the proper places and the image doesn’t resize. Then, Close Complete the ticket. There’s no need to leave a comment or wait for confirmation from the ticket creator.