Git Conventions
When interacting with multiple other developers on a single project, adhering to the same set of Git workflow rules is essential. The vast majority of our projects are maintained in GitHub, in one of two accounts depending on whether the project has an open source license: the Center for Distributed Learning account is for closed source projects, and the University of Central Florida - Open Source account is for open source projects.
As our project repositories are primarily housed in one of these two GitHub accounts, these instructions will focus primarily on GitHub. The specifics of issue, fork and pull request management may vary between Git providers, but the general conventions will remain the same.
Table of Contents
Issues
Viewing
Any given project will typically use issues to track work that needs to be done, be that fixing a bug or adding a feature. To view a repository’s issues (assuming the repository has issues enabled), click the ‘Issues’ tab (see below).
View Issues

Opening
As stated above, issues are used to track whatever work needs doing for a repository, whether that’s addressing a bug or implementing something new. If you encounter a bug while you’re interacting with a project, first go to the ‘Issues’ page (see above) and check all of the open issues to make sure somebody hasn’t already documented the bug you’re encountering (see below).
See All Issues

You can click any issue in this list to see that issue’s full title and description, as well as any relevant commits (more on that later) (see below). Note the ‘Create sub-issue’ button - see Sub-Issues for more context.
View Issue Details
If the bug you’re encountering or the feature you want to add doesn’t have an open issue already, you can create one yourself by clicking the ‘New Issue’ button on the right side of the ‘Issues’ page (see below).
New Issue - Issues Page

You can also create a new issue by clicking the ‘New Issue’ button on the right side of the page when viewing a specific issue (see below).
New Issue - Issue Details Page

Keep aware of which repository you’re interacting with when creating issues. Issues should be created on the original repository, not on your fork (refer to Forking for more context). Keep in mind that issues are per-repository, so any issues created on a fork will not be visible in the original repository and vice versa.
Be Descriptive
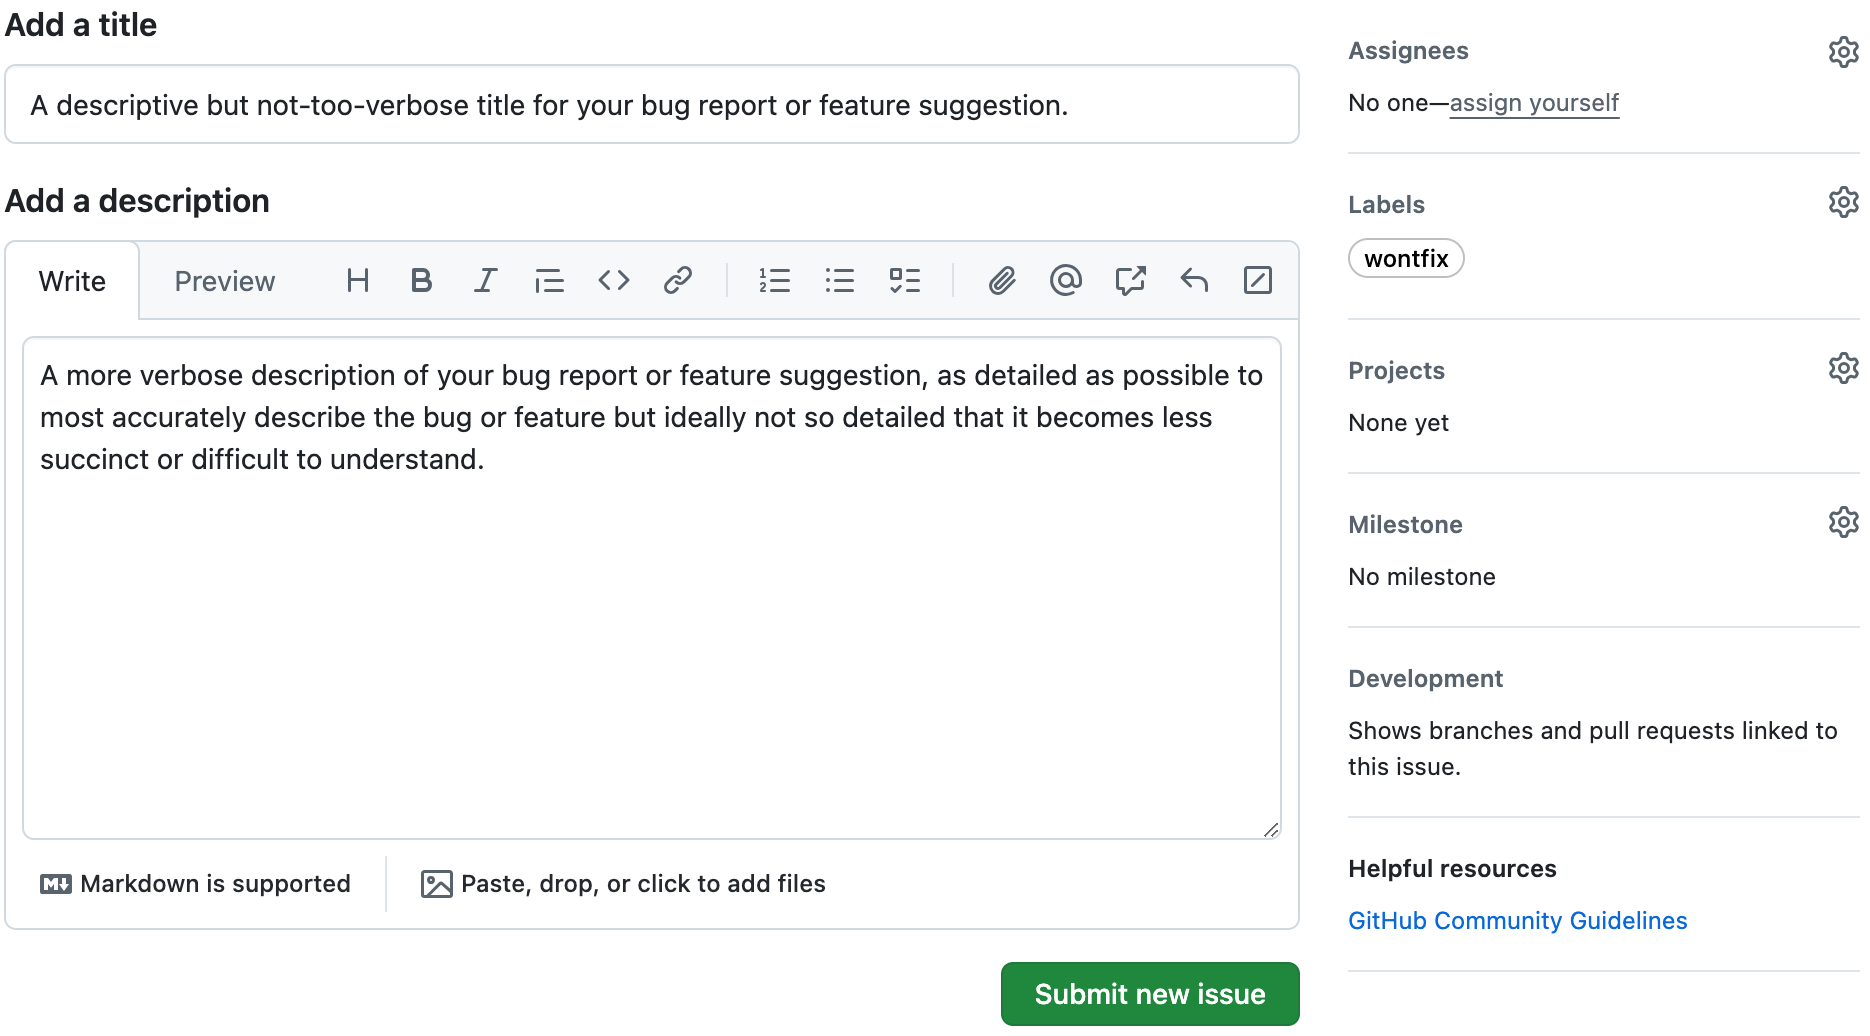
When creating a new issue, it’s important to provide a descriptive but succinct title so that it’s easy to identify in the full list. You can use the ‘Add a description’ area to provide additional details as needed to fully portray the issue’s requirements. In this interface you will also be able to attach labels to the issue, assign the issue to a project or milestone, or assign yourself to the issue if you plan on working on it immediately. All of this is optional, however - the only required information to open an issue is a title. Once you’re ready, click the ‘Submit new issue’ button (see below).
Opening an Issue
Assigning
It’s important to indicate what you’re working on to prevent your colleagues from accidentally working on the same thing. This will also allow your colleagues to see at a glance what you’re working on via the repository’s ‘Issues’ page (see below) If you need a reminder on how to access this page, refer to Viewing.
See Assigned Issues
In order to assign yourself to an existing issue, click the issue you want to work on in the list of issues under the repository’s ‘Issues’ page (see above), and then click ‘assign yourself’ along the right side of the page (see below).
Assign Yourself

Unassigning
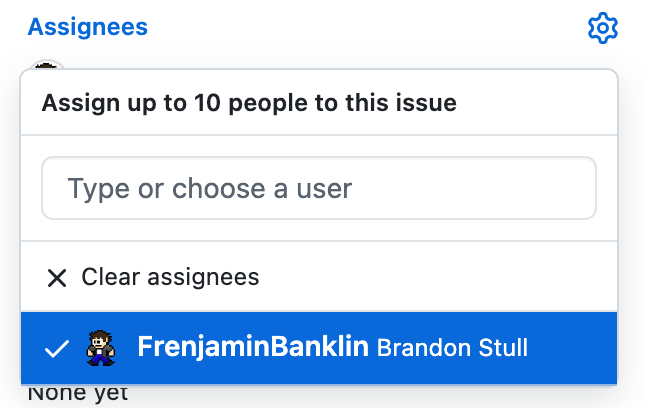
If you find that you are no longer able to contribute regularly to an issue’s resolution, don’t forget to unassign yourself so that one of your colleagues can work on the issue instead (see below). Clicking the gear icon to the right side of an issue’s ‘Assignees’ area and then clicking your name in the opened list will allow you to unassign yourself from an issue. Depending on your level of access to a repository, this menu may also allow you to assign an issue to (or unassign an issue from) other users with access to the same repository.
Unassign Yourself
Multiple Assignees
While typically an issue will only have a single person assigned to it, it is possible for issues to have multiple assignees. In cases where more than one person is assigned to an issue, it’s up to the assignees to communicate regularly and manage their work to avoid creating conflicting revisions. It is generally advised to constrain your work on an issue if you are one of multiple assignees, and to maintain your own fork of the repository (refer to Forking for more context). Try especially not to make changes to the same file as another assignee to avoid merge conflicts as much as possible.
Sub-Issues
Creating
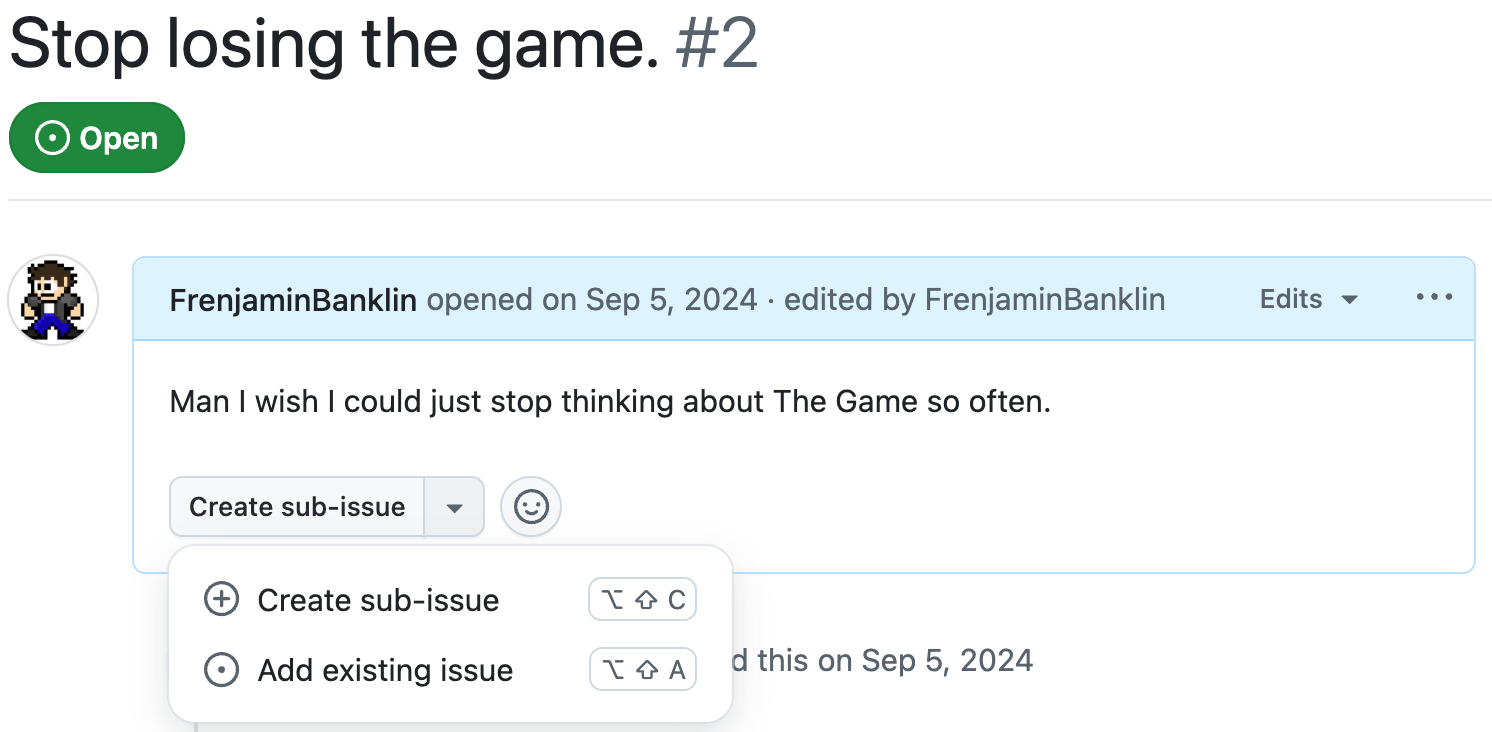
GitHub allows issues to be associated with the creation of sub-issues. After an issue is created, view the issue and note the ‘Create sub-issue’ button in the issue’s description area. Clicking this button will allow you to quickly create a new issue in a modal dialog without leaving the current issue’s page.
Create a Sub-Issue
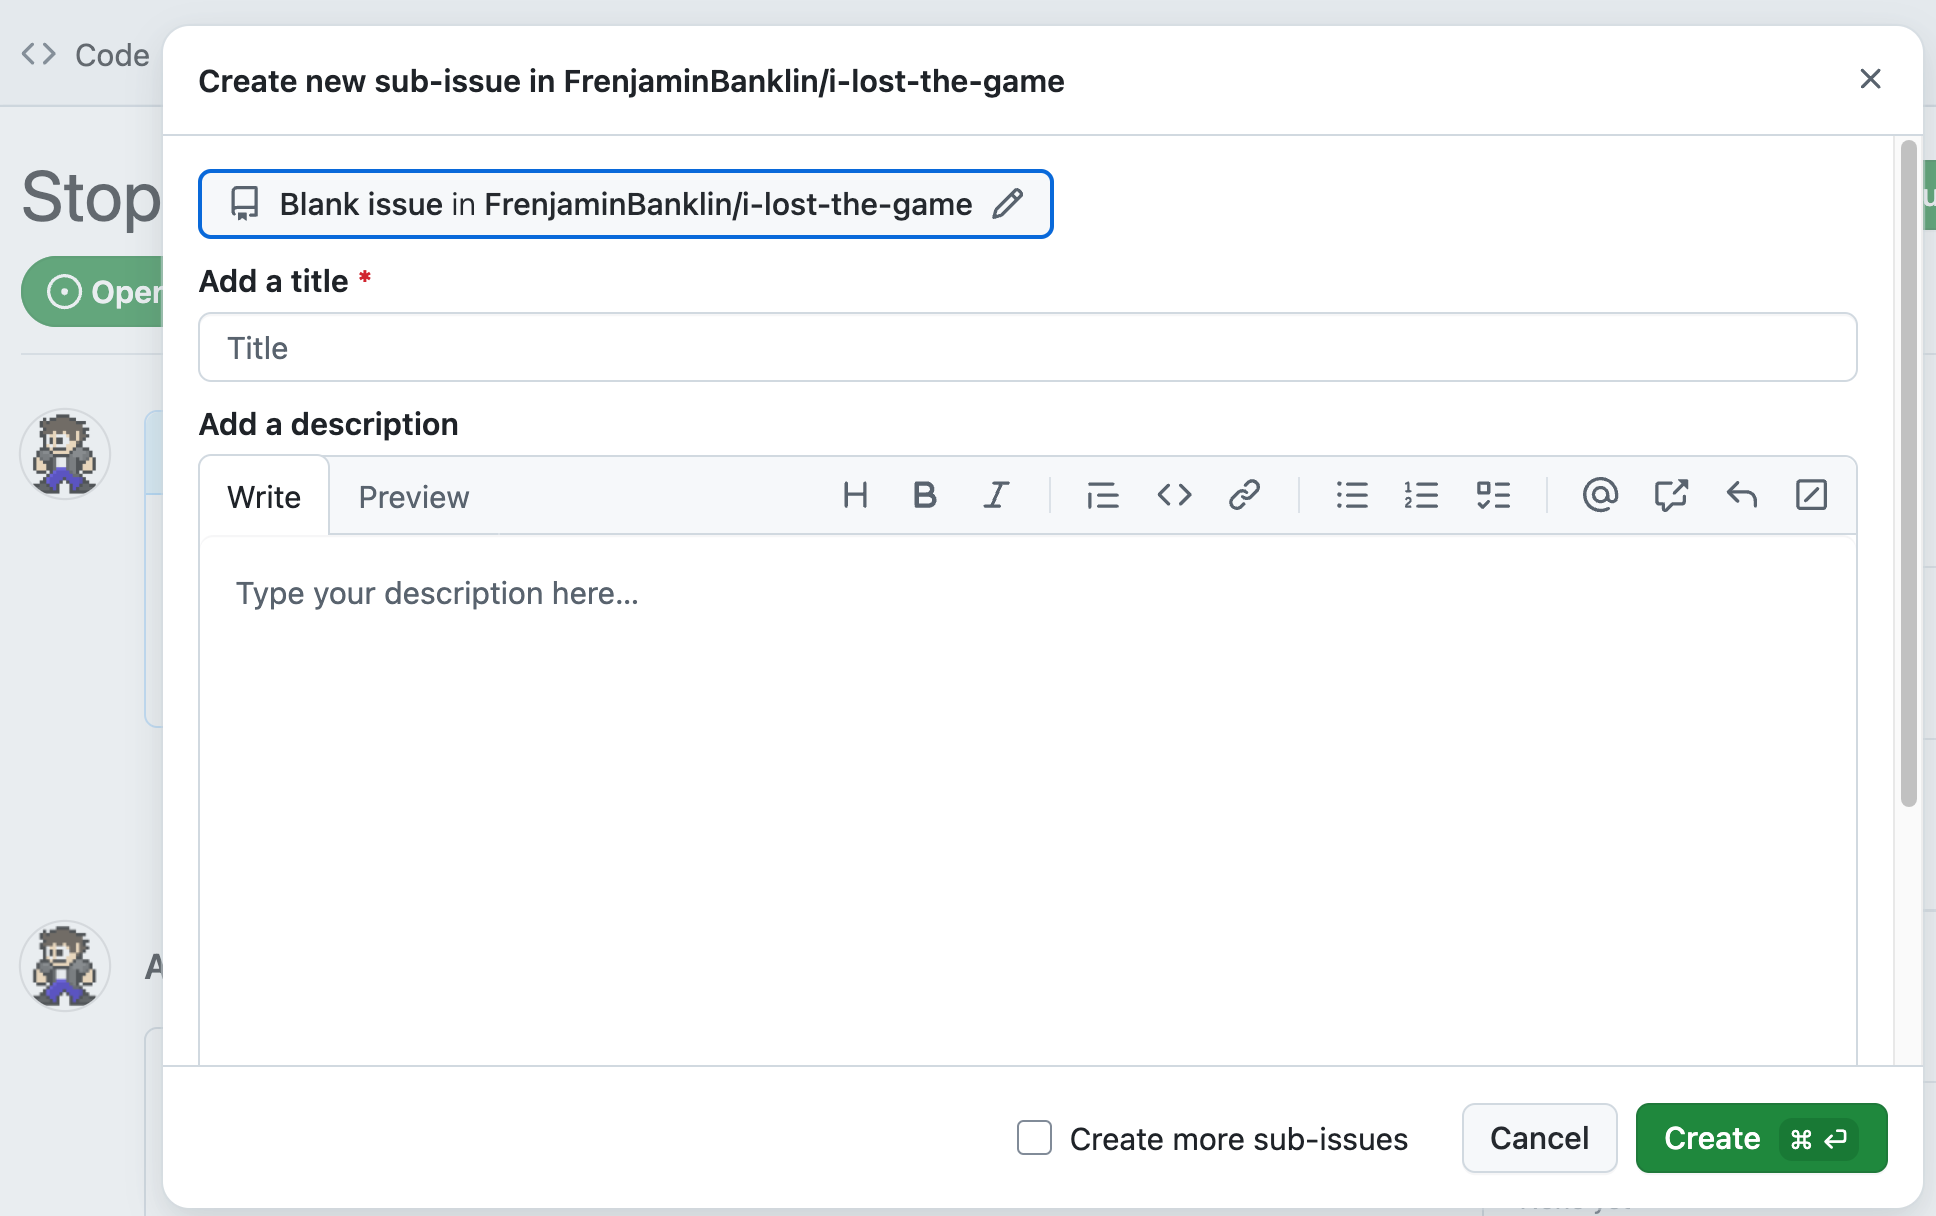
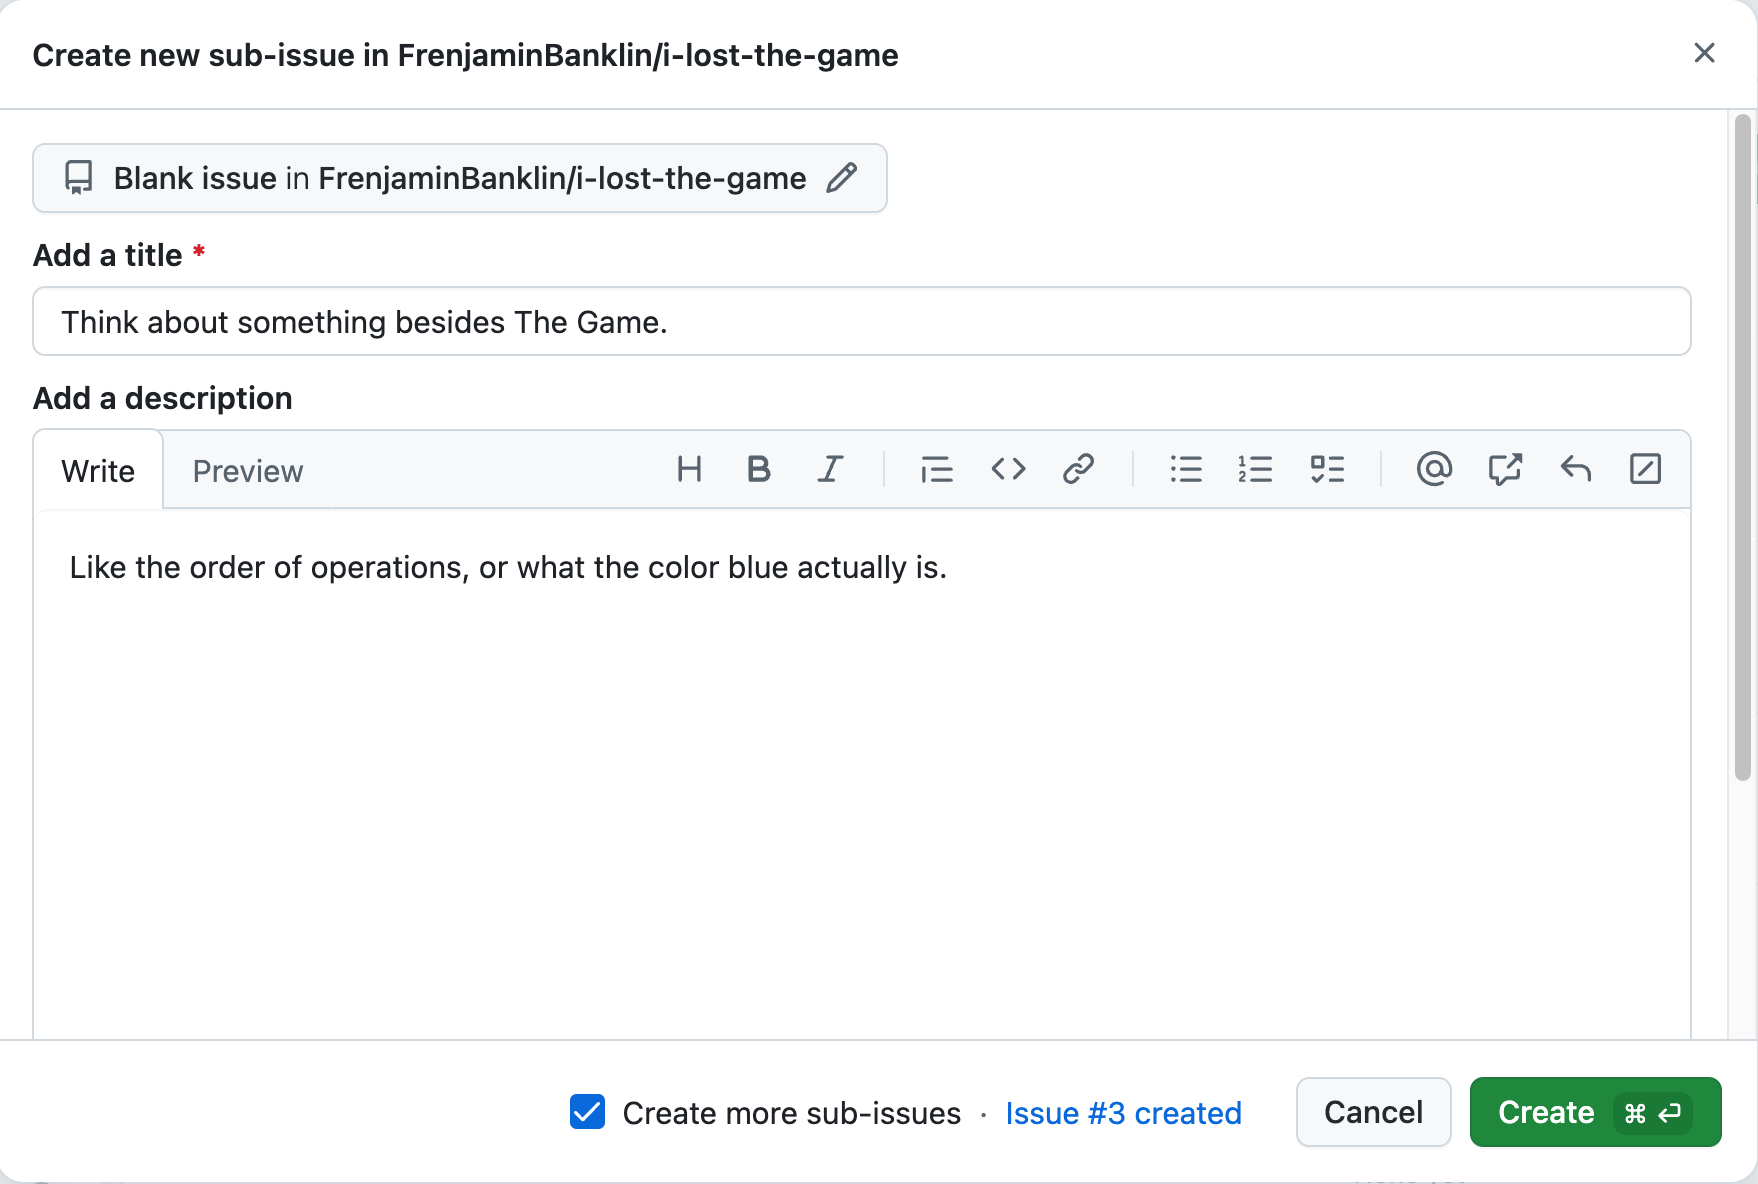
This modal will be a condensed version of the standard issue creation page (see Opening for more context), and the same guidelines should apply. Optionally, the ‘Create more sub-issues’ checkbox may be toggled on to immediately create another sub-issue after clicking the ‘Create’ button in the sub-issue dialog. Doing so will leave the dialog available, allowing you to change the issue title and/or description and quickly submit an additional sub-issue.
Note that when creating more than one sub-issue at a time, the dialog will be updated after a sub-issue’s creation to inform you of the issue number assigned to each sub-issue (see below).
New Sub-Issue Number
Viewing
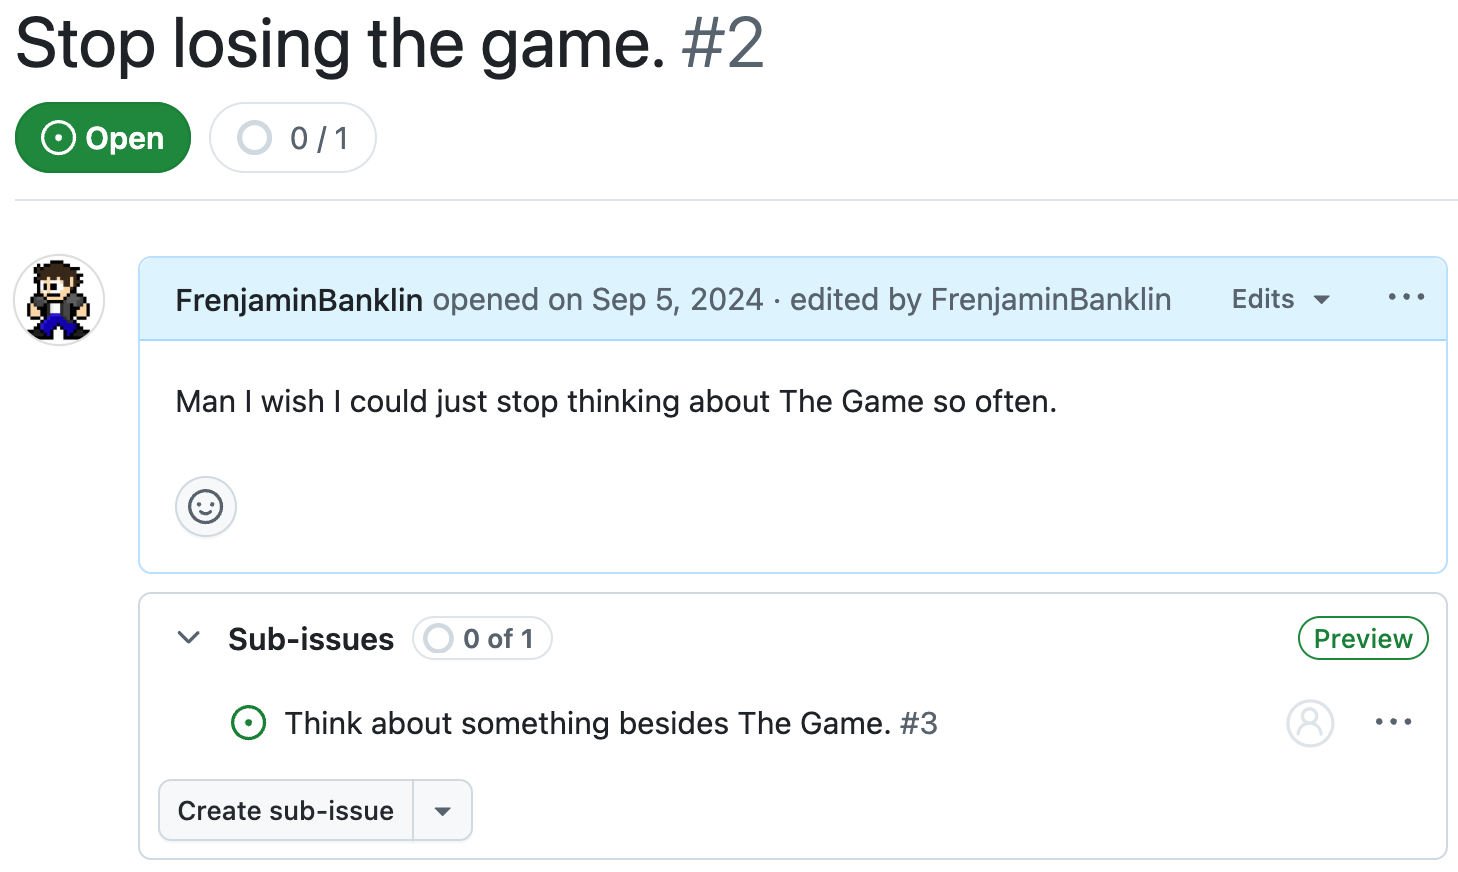
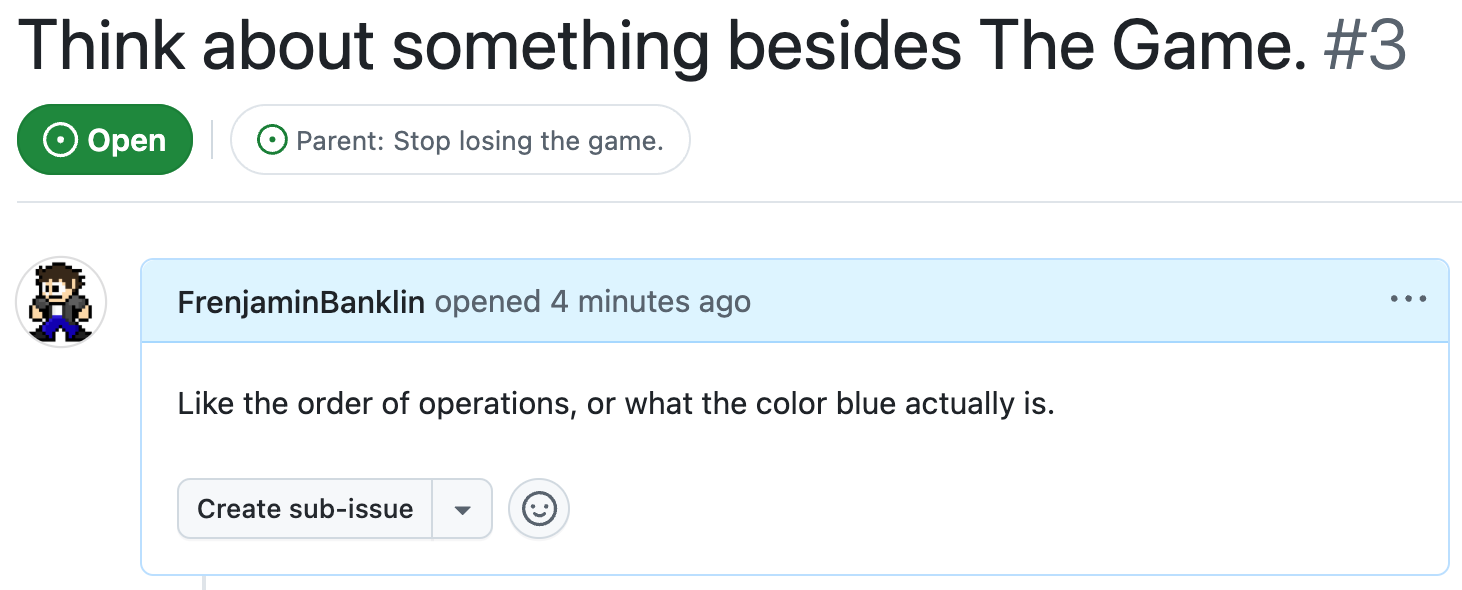
Sub-issues are actually just standard issues - they are each assigned their own issue number, and can be tagged and assigned as though they are standard issues. However, sub-issues are associated with their parent issue when viewing either the parent issue or the sub-issue itself (see below).
View Issue's Sub-Issues
View Issue's Parent Issue
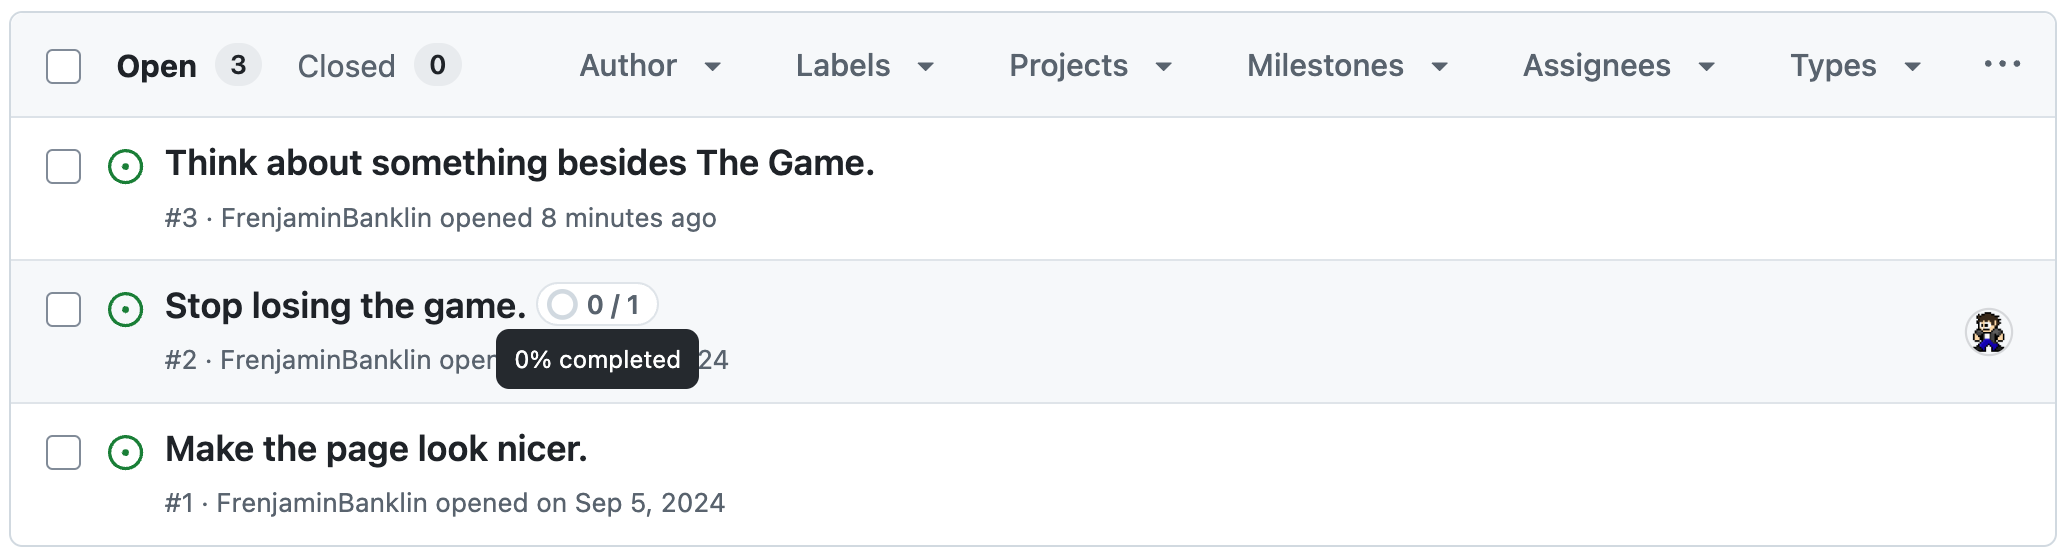
The full list of open issues will also indicate which, if any, of an issue’s assigned sub-issues have been closed/completed (see below).
Sub-Issue Completion Summary
Adding Existing
Issues can also be associated as sub-issues of another issue after their creation, or if they already existed beforehand. Click the arrow on the right side of the ‘Create sub-issue’ button to see both options (see below).
Sub-Issue Options
Clicking ‘Add existing issue’ in this sub-menu will allow you to select a previously created issue and associate it with the issue you’re currently viewing as a sub-issue (see below). Note that in this sub-menu you may also provide search terms to more easily find the existing issue you’re looking for.
Sub-Issue From Existing Issue

Removing
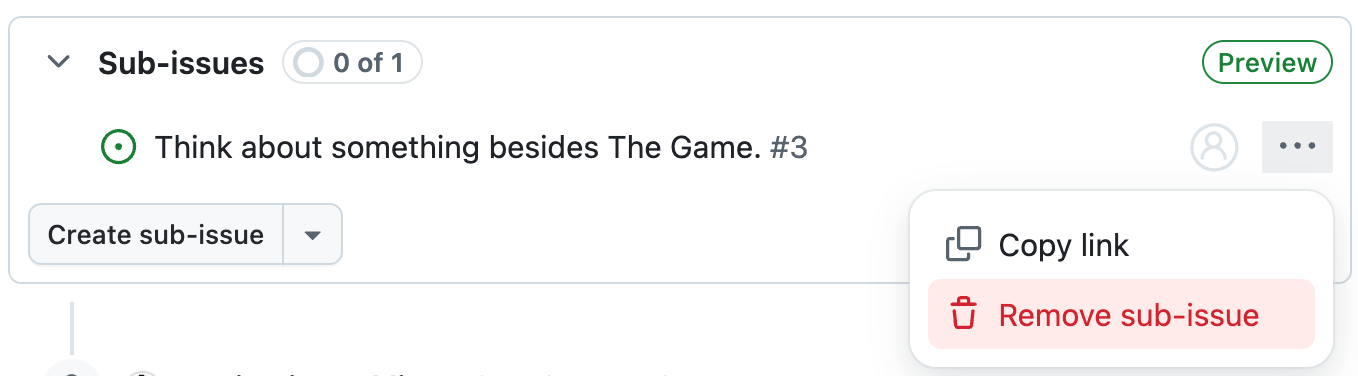
While viewing an issue, sub-issues may also be de-associated from it. To do so, when viewing an issue’s sub-issues, click the ellipsis menu button to the right of any sub-issue and then click ‘Remove sub-issue’ in the following sub-menu (see below).
Remove Sub-Issue
Forking
A ‘fork’ is a repository derived from another repository, sharing the original repository’s commit history (up to the time of the fork) and, in the case of GitHub, allowing users to conveniently make a copy of a repository that they can work on without potentially impacting the original repository (refer to Original Repository for more context). When each developer working on a project has their own fork, it is also easier to set up your remotes locally in order to share your progress with each other (refer to Setting Remotes for more context).
While ultimately up to a project’s chief maintainer, it is generally good practice to have your own fork of a repository in order to more easily ensure that you don’t inadvertently affect the original repository. Forks maintain their own branches and issues, and GitHub provides tools to easily make pull requests from forks back to the original repository (refer to Pull Requests for more context).
Original Repository
For example, look at the Git repository for the Techrangers Handbook. This can be considered the ‘original’ (or ‘upstream’) repository, from which many forks are derived. For any repository in GitHub, you can easily see how many forks have been created on that repository’s ‘Code’ page (see below).
See Fork Overview

Creating New Forks
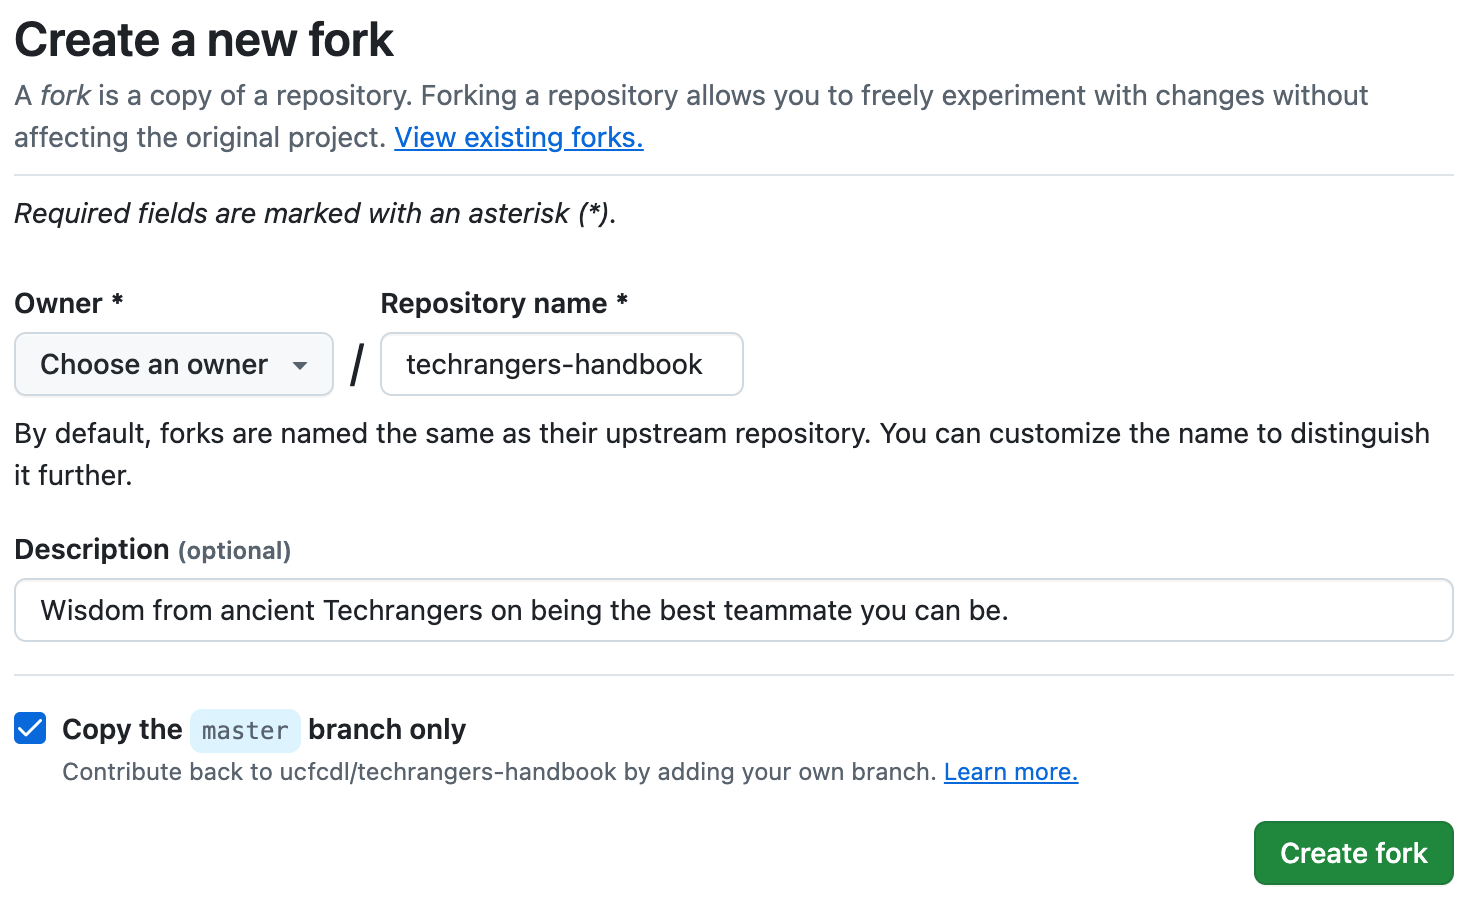
Clicking the ‘Fork’ button (see above) (with the number and the fork symbol) will take you to the ‘Create a new fork’ page, where you will be able to create a new fork of the repository in any of the accounts to which you have privileged access (you can also reach this page by adding ‘/fork’ to a repository’s base URL) (see below).
Create New Fork
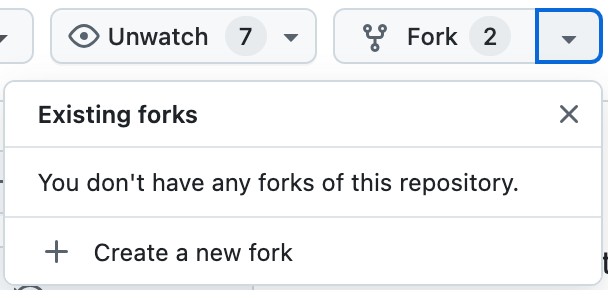
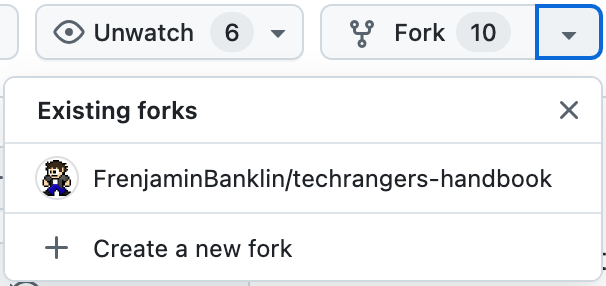
You can also quickly tell if you have any existing forks by clicking the list expansion button on the right side of the ‘Fork’ button (see below). If you have already made any forks of this repository, they will be listed here. If you have not made any forks, you can also reach the ‘Create a new fork’ page by clicking the ‘Create a new fork’ button that appears at the bottom of the list (see below).
Quick Check Your Forks
Be very careful when creating forks of private repositories. Make sure that you select your own user account as the ‘Owner’ when generating a new fork, to prevent private and/or sensitive repositories from accidentally being forked in such a way that would make them publicly visible. While you may technically provide the fork with any name you wish, it is recommended that you use the original repository’s name (which should be the pre-filled value). You will also have the option of copying only the primary branch (usually ‘master’ or ‘main’) of the original repository, or all branches. It is recommended that you keep this box checked - once your fork exists, you can easily mirror additional branches from the original repository (see Setting Remotes for more context), and unchecking this box can potentially mean polluting your fork with many unnecessary branches.
When you have selected your own account and settled on a name for your fork (remember - it’s recommended to keep the original name), click the ‘Create fork’ button and GitHub will handle the creation of your fork (see below). Once your fork has been successfully created, GitHub will redirect you to it automatically.
Your Fork

Keep in mind that only the codebase and branches (or only the default branch, when selected) will be copied to your fork - issues, wiki pages, secrets and repository permissions are specific to each repository, and will not be mirrored across forks.
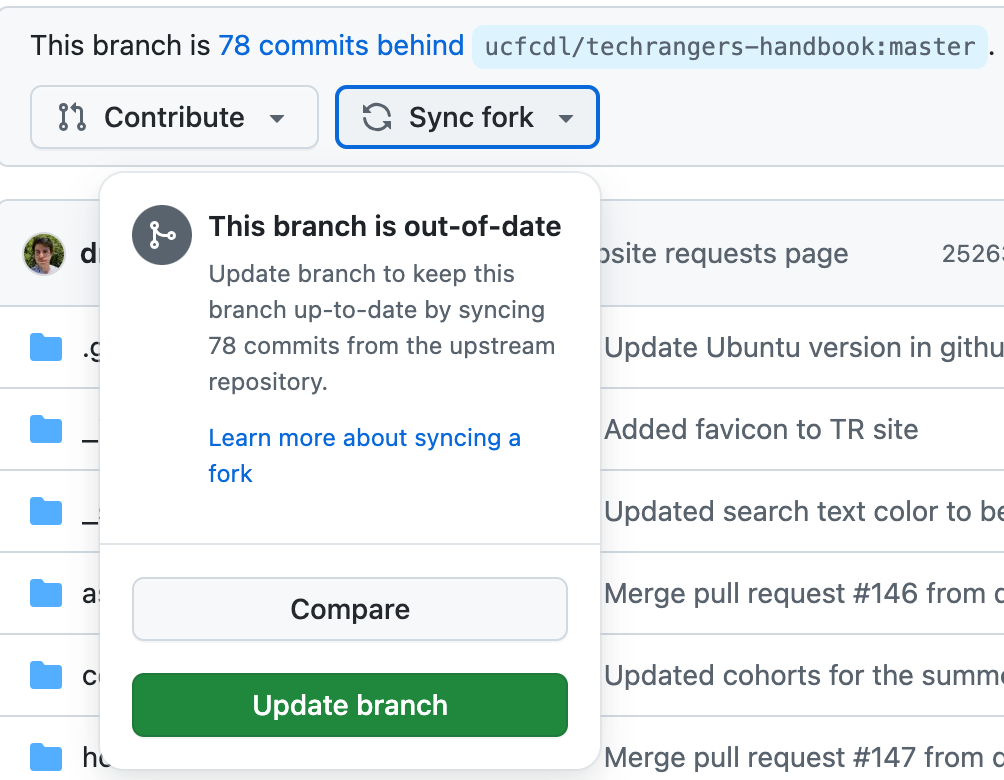
GitHub provides several convenience features to fork repositories, such as synchronizing changes from the upstream repository if your fork is out of date (see below). This guide will go into more detail explaining how to keep your fork up to date via terminal commands (see Setting Remotes for more context), so any specifics regarding the GitHub sync functionality will not be covered.
Sync Changes to Your Fork
Once you have a fork, you may notice that if you click the list expansion button on the right side of the ‘Fork’ button (refer to Creating New Forks for more context), your fork(s) will appear in the list. You can click these items to be quickly taken to the corresponding fork’s repository page.
Quick Check Your Forks
Additional Forks
Note on the ‘Create a new fork’ page the ‘View existing forks’ hyperlink. Following this link will take you to a page listing all of the forks created from the given repository (you can also reach this page by adding ‘/forks’ to a repository’s base URL) (see below). This list will be helpful in locating your colleagues’ forks of any projects that you are working on together (see Setting Remotes for more context).
All Existing Forks
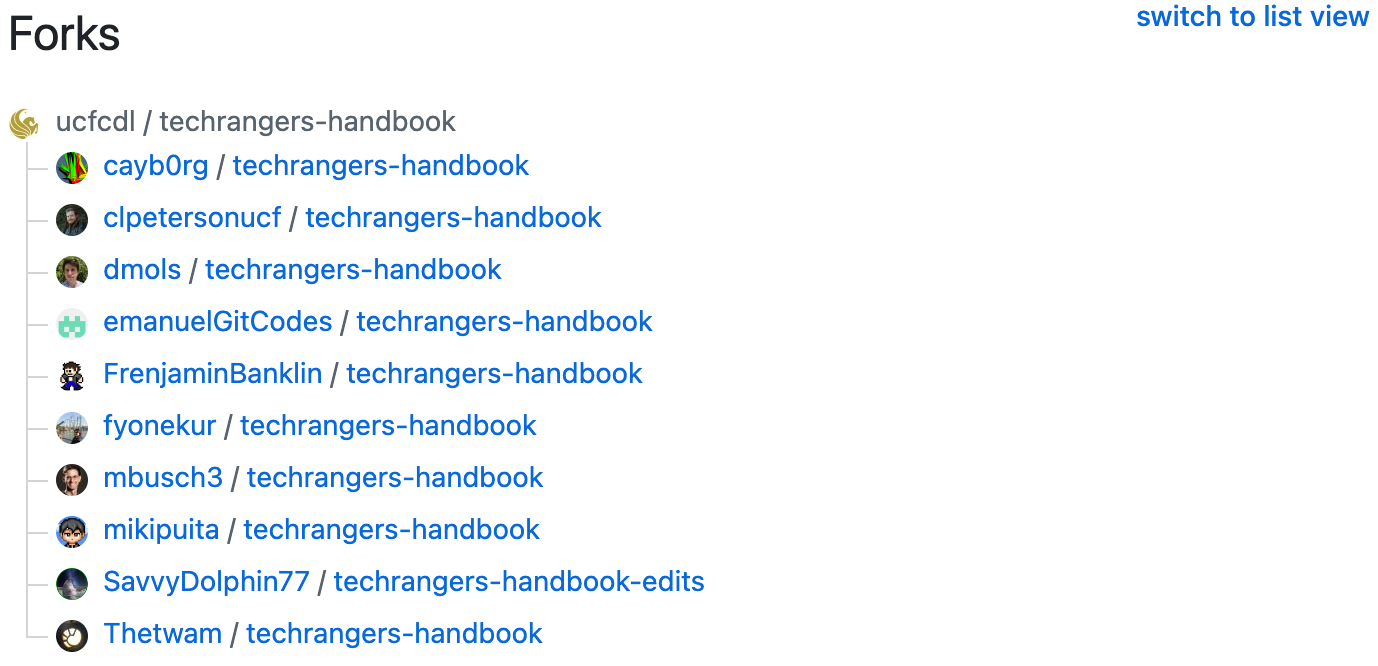
Clicking any of the hyperlinks visible on this page will direct you to that fork’s GitHub repository page. You can view branches, issues, and clone URLs for the fork the same way you would for the original repository.
Issues
Be careful when opening new issues (refer to Opening for more context) with regards to forks. You should always open issues on the original repository for a project, not on your (or anyone else’s) fork.
Cloning
Before trying to clone your repository, it is highly recommended that you create an SSH key (refer to Set up GitHub for full instructions). While you can clone a repository using HTTPS, and can do so with less preparation ahead of time, it is generally more convenient (and secure) to use SSH. You will also need to have Git installed (refer to Version Control (Git) for full instructions) in order to run git commands on your machine. These instructions will assume you have created and are using an SSH key, and that you have set up your Git profile locally. To simplify examples, these instructions will also assume you are trying to clone your fork of the Techrangers Website repository.
Regardless of your chosen method, you can find the URL needed to clone your repository by clicking the ‘Code’ button on the right side of the ‘Code’ page of your repository (see below).
Clone Your Repository
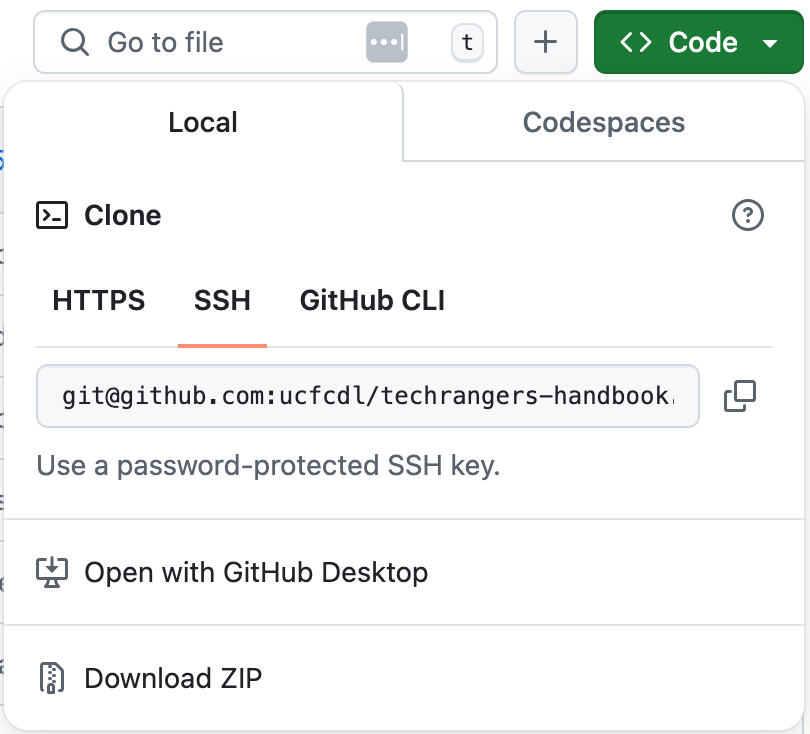
Copy the URL for your selected clone method from the ‘Clone’ window that appears (see above), and open your preferred terminal application in which Git has been installed. You can clone a Git repository as follows:
git clone git@github.com:YourGitUsername/techrangers-website.git
You can also provide a second argument to git clone if you want to clone the repository to a specific folder name. For example, the following command would clone the repository to a ‘tr-site’ directory:
git clone git@github.com:YourGitUsername/techrangers-website.git tr-site
By default, cloning a Git repository will set the provided URL (in this case, git@github.com:YourGitUsername/techrangers-website) as the fetch and push URL for the ‘origin’ remote. Remotes will be covered in more detail in the following section. By default, the repository should also be tracking the primary branch (in the case of the Techrangers Website repository, the primary branch is ‘master’). You can confirm this with the git status command:
git status
# expected output below

On branch master
Your branch is up to date with 'origin/master'.

nothing to commit, working tree clean
Setting Remotes
As mentioned in Cloning, by default a freshly cloned repository will assign the URL used for the clone to the ‘origin’ remote. It’s easiest to think of remotes as tracking the locations of the forks of a repository - by following these instructions your own fork should be tracked as the ‘origin’ remote. You can see all of the currently tracked remotes with the git remote show command, and you can see information about a specific remote with the git remote show remotename command (where ‘remotename’ will be the name of the desired remote). For example:
git remote show
# expected output below
origin
git remote show origin
# expected output below
* remote origin
  Fetch URL: git@github.com:ucfcdl/techrangers-website.git
  Push  URL: git@github.com:ucfcdl/techrangers-website.git
# etc.
The git remote show remotename command will also show all of the branches that your local clone of the repository is aware of from that remote. This will come in handy when adding your colleagues’ forks as remotes in order to collaborate or test their changes (see Create a Remote for a Colleague for more context).
Remotes can be named arbitrarily, but it is typical for remotes tracking the original repository to be named ‘upstream’. By tracking the original (or ‘upstream’) repository, you can easily check out branches from the original repository and synchronize changes on those branches to your own fork.
Create Upstream Remote
To start, create a remote named ‘upstream’ that refers to the original repository. Remember that you can find the URL to clone a repository on the ‘Code’ page for that repository (refer to Cloning for more context). In the case of the Techrangers Website repository, that value is ‘git@github.com:ucfcdl/techrangers-website.git’. To create a new remote to track that repository, run the following command:
git remote add upstream git@github.com:ucfcdl/techrangers-website.git
You can now check the upstream remote with git remote show upstream to confirm that the URL is correct, see available remote branches, and so on. Additionally, you can run git fetch upstream to see if there are any changes to important branches (‘master’, for example), new branches, and so on.
Create a Remote for a Colleague
If a colleague is working on the same project and has created their own fork, you can also add their fork as a remote. For example:
git remote add person-x-fork git@github.com:TheirGitUsername/techrangers-website.git
You can now run commands such as git fetch person-x-fork to see all of the branches specific to your colleague’s fork, which will enable you to collaborate on a common branch or to evaluate their changes.
Branching
In general, you should not create branches on the original repository for any given project (refer to Original Repository for more context). Once you have created your own fork of a project repository (refer to Creating New Forks for more context), you may create new branches freely.
That being said, your branch names should follow a convention when possible. This will allow you to easily transition between them, and it will make it easier for your fellow developers to find them when collaborating.
Assuming you have cloned your fork of a repository (refer to Cloning for more context) and assigned yourself to an issue (refer to Assigning for more context), you should create a branch named after that issue to more easily collect changes relevant to the issue - and to make sure those changes only occur on your fork, rather than on the original repository.
Naming Convention
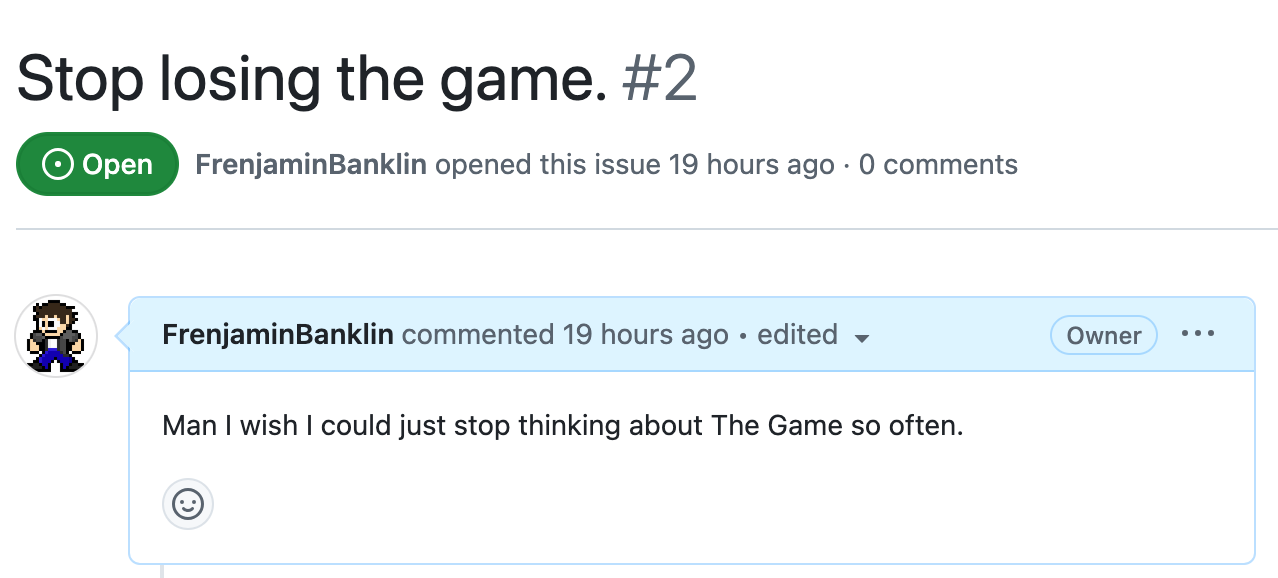
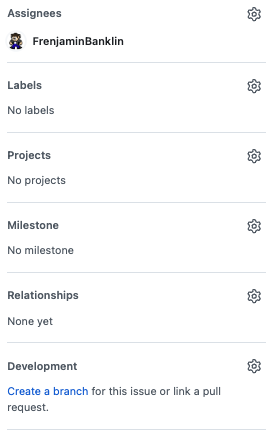
Branch names should be succinct but still descriptive, and at minimum should include the issue number so that they are easier to locate when working on multiple issues at once. For example, assume that you have assigned yourself to an issue with an ID of ‘2’ and a title of ‘Stop losing the game’ (see below).
Example Issue
You would want to create a branch named something similar to ‘issue/2-stop-losing’. This immediately communicates three things: that this is an issue branch, which issue the branch corresponds to, and in a few words what the purpose of the branch is.
Creating Branches
In Terminal
When you create a branch, it will by share the history of the branch it is created from up to the point in time at which it was created. For example, suppose you’ve checked out a branch named ‘dev’:
git checkout dev
Assuming your local copy of ‘dev’ is up to date, when you create a new branch it will be up to date with the dev branch:
git checkout -b issue/2-stop-losing
The above command is a shortcut - combining the git branch and git checkout commands to create a branch called ‘issue/2-stop-losing’ and immediately checkout that branch.
At this point you may also want to push your new branch to your fork so that it is tracked in the correct location:
git push -u origin issue/2-stop-losing
The above command is doing several things - it’s pushing the branch named ‘issue/2-stop-losing’ to the ‘origin’ remote and tracking that remote as the default remote for the branch. This, in short, means that you can confidently expect your local ‘issue/2-stop-losing’ branch to track the remote ‘issue/2-stop-losing’ branch at the ‘origin’ remote (which, if you have followed these instructions, should be your fork).
In GitHub
Branches can also be created for issues directly in GitHub from the issue details page. If you need a reminder on how to access this page and what it contains, refer to Be Descriptive.
Within one of the areas on the right side of the issue details page, under the ‘Development’ heading, you will see a ‘Create a branch’ link.
Issue Options
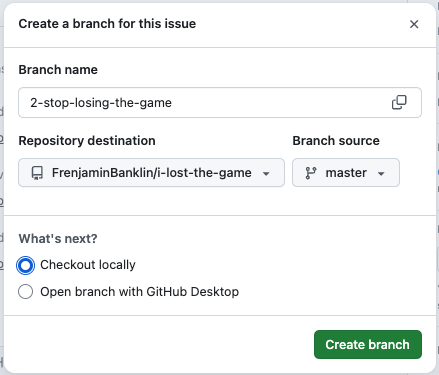
Clicking ‘Create a branch’ will display a new modal dialog in which you can use to quickly create a branch by specifying a branch name, source branch and target repository (see below). Note that the current repository is selected by default, and keep in mind that it is good practice to create issue branches on your fork instead of the original repository (see Forking for more context). This interface will also allow you to choose whether you’d prefer a checkout command (which is selected by default) or to open the branch with GitHub Desktop, which will not be covered here.
Create Issue Branch
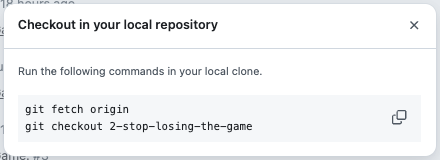
Upon completion of the branch creation, you will be presented with the necessary terminal commands to check out the new branch locally (see below).
Checkout Command
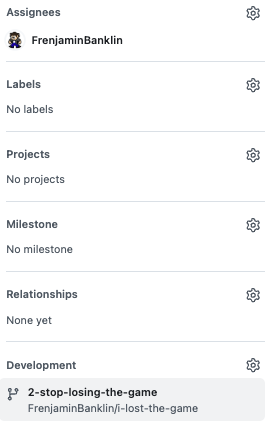
Following this process will also automatically associate the newly created branch with this issue, which will replace the ‘Create a branch’ link on the right side of the issue details page (see below).
Associated Branch
Handling Branch Name Collisions
With any luck, you shouldn’t have to deal with two different forks having branches of the same name (except for the primary branch, or potentially a shared development branch). Losing track of which remote branch a local branch is tracking can cause a lot of headaches.
For example, by default both the original Techrangers Website repository and your fork will have a ‘master’ branch. When you clone the repository (assuming you used your fork’s URL to do so), your local ‘master’ branch will be set up to track the ‘master’ branch of your fork, not the ‘master’ branch of the original repository.
This can make it difficult to synchronize changes from the original repository to your fork if you’re not paying attention. In cases like the ‘master’ branch, you can potentially change which remote your local ‘master’ branch is set to track with the git branch --set-upstream-to command:
git checkout master
git branch --set-upstream-to upstream/master
The above command will set up your local ‘master’ branch to track the ‘master’ branch at the remote named ‘upstream’ - which, if you’ve followed these instructions, would mean that when you run git checkout master and git pull, you will be checking out (and pulling changes to) the original repository’s ‘master’ branch.
Keeping Up-to-Date
You can also synchronize these changes to your fork’s ‘master’ branch without changing which remote your local ‘master’ branch is tracking:
git push origin master
The above command will (assuming you ran git pull at some point to pull changes to the ‘master’ branch from the ‘upstream’ remote) bring your fork’s ‘master’ branch up to date with the original repository’s ‘master’ branch (assuming ‘origin’ refers to your fork).
Commits
File Changes
Before committing changes to a branch, it is important to make sure you know what you’re committing. A common pitfall is to add all changed files to a commit with a command like:
git add .
Be very careful when using the above command to add all changed files, as this carries the risk of accidentally committing security details, large SQL files, local configuration settings, and so on. While it may seem more tedious, it is generally better practice to add changed files to a commit individually (assuming the added files do not contain any risky security details), so it is easier to keep unwanted files out of the repository’s revision history.
Commit Messages
The best approach to commit messages can be highly subjective, but there are some basic conventions that you should follow when writing simple commit messages to make them easier to review for your colleagues (and your future self).
Editor
By default, Git will write commit messages with vim. If you’d rather use something like nano (assuming you have nano installed), for example, you could run the following command:
git config --global core.editor "nano"
The text editor you use to write your commit messages is largely a matter of personal preference. You can also write commit messages without ever using a text editor with the -m flag:
git commit -m "commit message"
Issue Reference
When possible, try to refer to the GitHub issue relevant to your commit. For example, suppose you have checked out issue/2-stop-losing, the GitHub issue ID will be ‘2’, and you could refer to it properly with a commit message similar to the following:
git commit -m "#2 Tried to stop losing The Game"
Assuming you push the branch with this commit to a fork, a reference to this commit will now appear on the issue page in GitHub. This can be useful in checking what work has been done towards a particular issue.
Pull Requests
When you’ve finished working on an issue and are ready to merge your changes back into the codebase, you can create a pull request from the relevant issue branch on your fork to whatever the original repository’s designated pull request target branch is (this is largely up to the project’s maintainer). GitHub will temporarily offer to automatically generate a pull request for branches that have recent pushes which automates much of this process (see below), but it is important to know how to create a pull request from scratch.
Pull Request Creation Shortcut

You can view all open pull requests and create a new pull request in the ‘Pull requests’ page of the original repository, reachable by clicking the ‘Pull requests’ tab from anywhere on the GitHub repository page (or by adding ‘pulls’ to the repository’s base URL) (see below).
Pull Request List

Opening
To create a new pull request, visit the ‘Pull requests’ page of the original repository and click the ‘New pull request’ button on the right side of the page (see above). This will take you to the ‘Compare changes’ page, where you can specify your source and target branches for the pull request.
Pull Request Compare Default View

If you are visiting this page in the original repository, both the ‘base’ and ‘compare’ lists will be constrained to the original repository by default. You’ll have to click the ‘compare across forks’ link on the right side of the page (see above) to enable the selection of forks in either list.
After doing so, you should notice that instead of two drop-down selectors you will now have four: two on the left side indicating the base repository and branch, and two on the right side indicating the head (or source) repository and branch (see below).
Pull Request Compare Across Forks

The ‘base repository’ drop-down selector should remain on the default option - this will target the original repository with the pull request you create. The selected value of the ‘base’ drop-down selector should default to the primary branch for the repository, but should be changed to whatever the designated pull request branch is for the repository you’re interacting with (again, check with the project maintainer to know for sure which branch this is).
The ‘head repository’ drop-down selector should be changed to whichever fork the work was done on - either your own or, if you are opening this pull request on behalf of a colleague, your colleague’s fork. The ‘compare’ drop-down selector should be constrained to the available branches in the head repository - select whichever branch needs to be merged. See below for an example of what the selections should look like.
Pull Request Final Comparison

You’ll notice that after selecting the base (target) branch and the compare (source) branch, the page will change to display all of the relevant changes to the pull request you’re about to create: how many commits there are between the two branches, how many files were changed, and how many developers were involved in those changes. All of the file changes will be visible on this page as well, as a means of previewing the pull request before finalizing it. Click the ‘Create pull request’ button on the right side to proceed to the final page (see below).
Pull Request Creation Completion
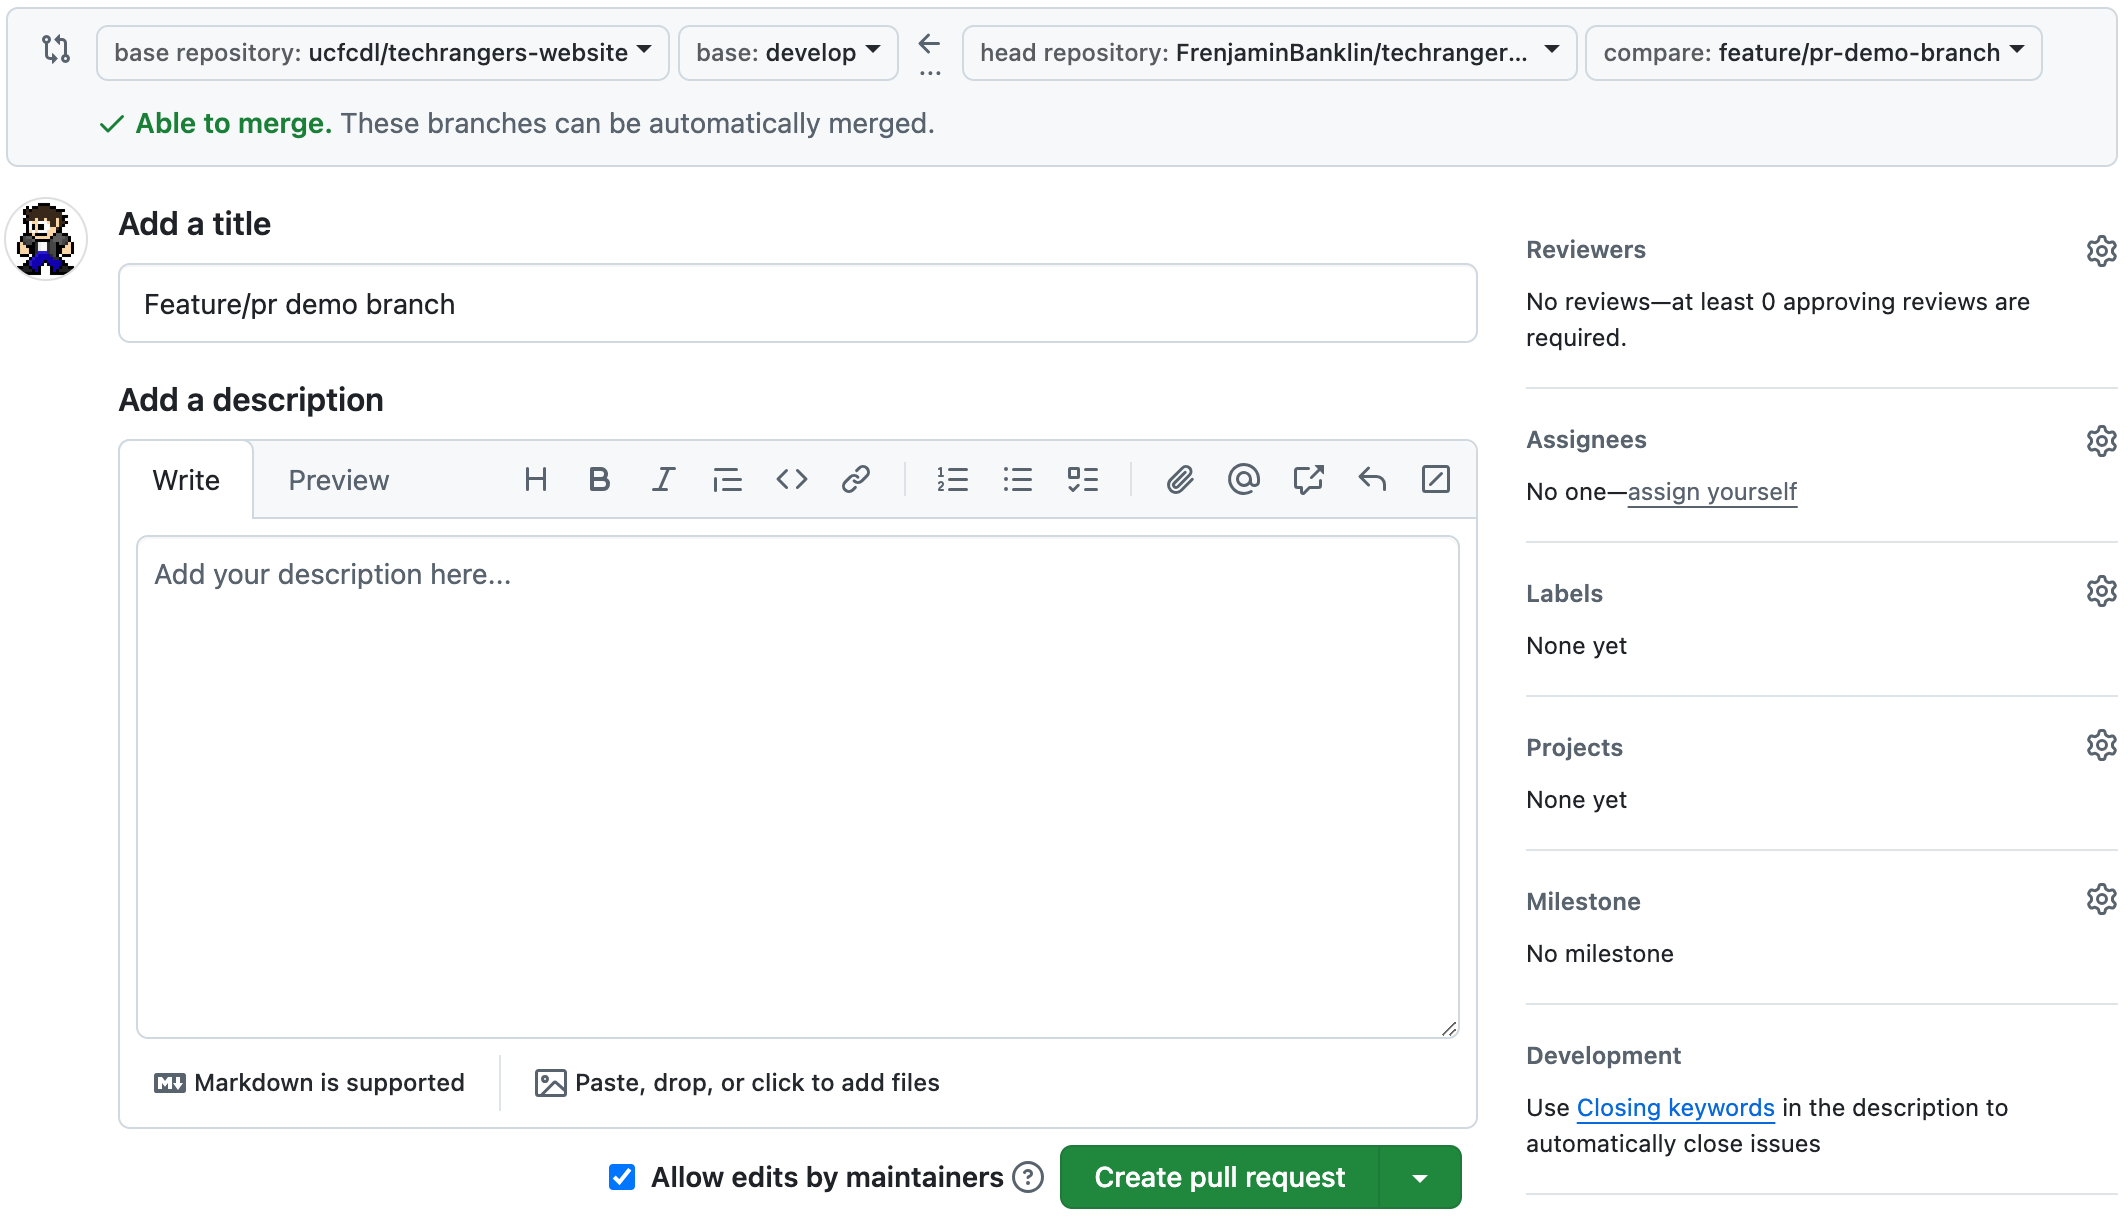
In this final step, you can give the pull request a title and a description much like you would if you were opening an issue (refer to Opening for more context). Follow the same guidelines when creating a pull request as you would when creating an issue: use a succinct title, and provide as much detail as necessary in the description. You will also have the opportunity to request reviewers on this page by clicking the gear icon to the right of the ‘Reviewers’ section heading (see above).
Draft Pull Requests
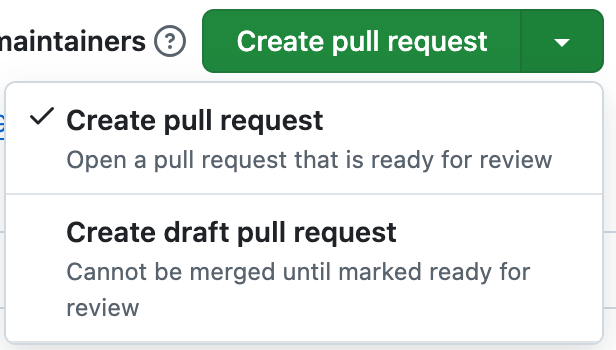
If you are pre-emptively opening a pull request to better document progress towards an issue’s resolution, you should open that pull request as a draft. By clicking the list expansion button on the right side of the ‘Create pull request’ button, you will have the option of determining whether the pull request is a draft or not (see below).
Pull Request Draft Toggle
Issue Linkage
You should also use pull request keywords to link this pull request to its corresponding issue. When using these keywords, and assuming the original repository is configured to do so, the issue should be closed automatically when the pull request is merged.
Highlights
The most important things to take away from these instructions are as follows:
- Create a fork of whichever repository you’re working on.
- Do all work on your fork, not on the original repository.
- Unless the primary maintainer of the original repository says otherwise.
- Create an issue/#-description branch before doing any work.
- Do not make commits to the ‘master’ branch - not on your fork, and definitely not on the original repository.
- Make pull requests from the issue branch on your fork to the designated PR branch on the original repository.
- This can vary from project to project - follow the repository maintainer’s instructions.