Update Website Requests
How you complete a request depends on the type of request. DDL Communication Requests are the type that our Instructional Designers use to request changes to pages on the various websites we manage.
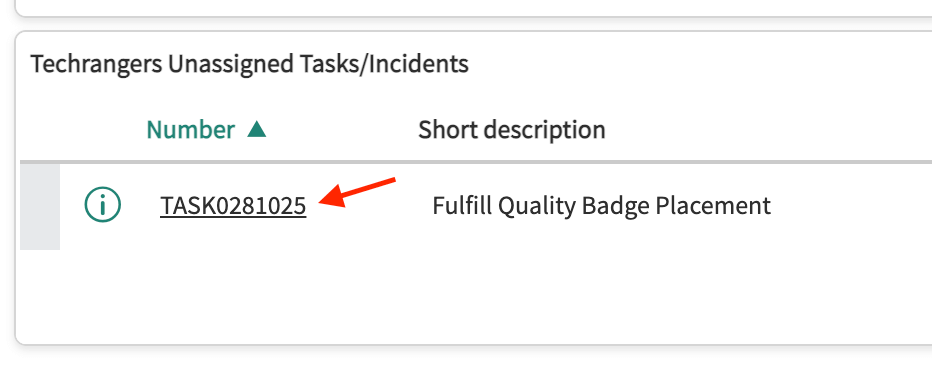
Assign the Request to Yourself
Click on the TASK number of the request you’d like to work on.
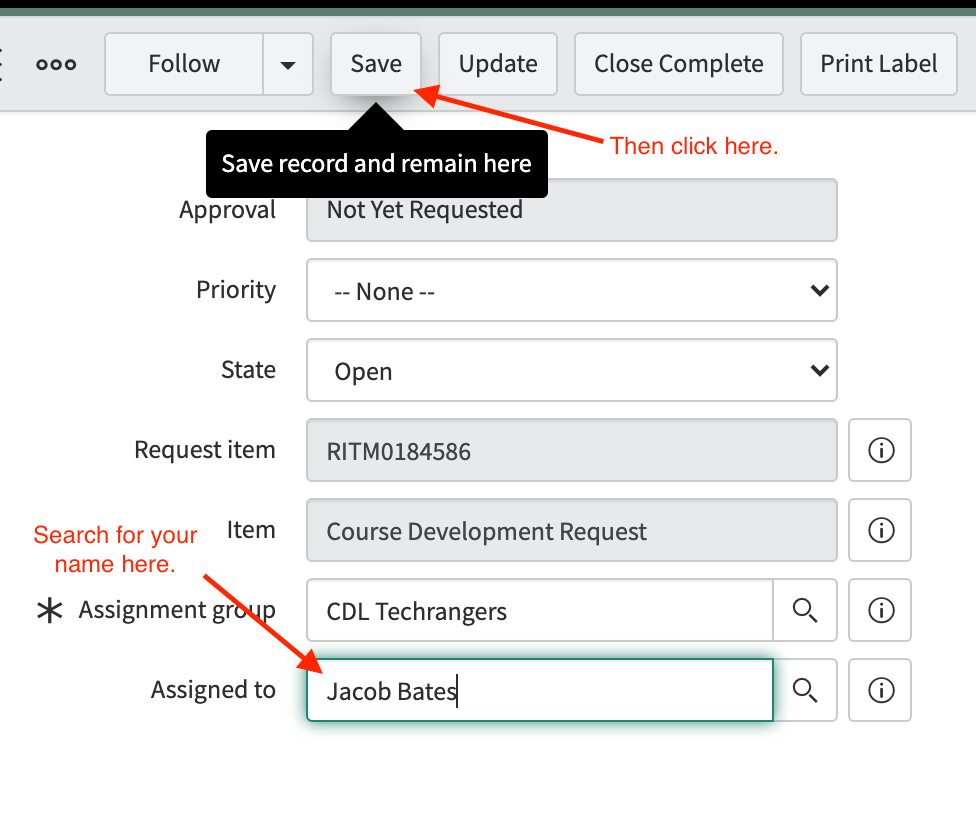
Then, type your name into the Assigned To box. You can also type your NID. Wait a moment for the search to complete, then click on your name in the search results. Then, click the Save button.
The request is now assigned to you!
Read and Understand the Request
Read all of the information that was submitted with the request, Work Notes, and Additional Comments. If you do not understand something, or you’ve never done this type of request before, ask about it in the #tickets channel in Slack. Feel free to @ your trainer, Kylee Woodland, and/or Matt Emond if nobody is responding.
Ensure You Have Access to The Site
In order to edit the site and fulfill the request, one must have permission and an Wordpress account on the site. If you are new to the Techrangers team then simply ask in the Slack channel #tickets for access. Make sure to include the ticket number and what site the ticket wants you to edit.
Due to the numerous sites that the Techrangers team manages you may have to do this more then once if it is your first time working on a ticket for that site.
Do the Work
Follow the instructions in the request, Work Notes, and Additional Comments to complete the work. Most requests typically have you go to a page that the ticket describes to then add or remove content. It is important to check attached files located near the bottom of the ticket to see files which contain the content the issuer of the ticket wants you to use.
Understanding Wordpress
Wordpress is what our sites run off of. Once you are logged into the Wordpress site that you want to edit, you can simply type the url of the page you want to edit to take you to the page. While still logged in you should see an edit page button on the bottom of the screen, letting you edit the page.
NOTE: The websites are currently live and all page updates will immediately take effect. It is important that you do not press update until you are finished with the request. Also, do not convert the page into a draft as that will take the whole page down.
Now that you are on the page you want to edit, it is important to understand a few key features. One, is that you can switch between the block visual editor to a text editor in HTML 5 by clicking the three dots in the upper right hand corner and then looking for the code editor in that menu. This will allow you to see the code which gives you more flexibility for editing the page in terms of CSS and HTML styles.
If in the case you need to do something more advance, head to the Word Press dashboard so that you can see a variety of menu options. Form the plugins, to pages as well as tools and settings these menus will let you customize the site fully if the job cannot be finished by just editing the page. For more tips and tricks that are more advance and common to show up, check up the Additional Key Notes section below.
Additional Key Notes
Website requests can vary greatly and it is very important to read all the details you are provided in the ticket. However, some are common and niche so we have a few tips and tricks to help out on these tickets.
Topkit Advisory Board
Your ticket may request you to edit the Topkit Advisory Board in which you add or remove members. This board is a slide with all the members and their information, and it is located on a few pages but it is all updated from one central place. This is located under settings and then click global custom fields. There will be a text box underneath the title Advisory Board and this is what you want to edit.
Note that it is highly recommended that you copy and paste the current text into a document somewhere safe as once you click update options it updates the board live and past versions are gone.
Uploading Pictures to Wordpress
Sometimes you are given some images to add to the site that you need to upload and add to the site. Due to the site being located on the cloud, one must first upload them so they can access them via Wordpress and in HTML. To upload in Wordpress you will want to go media section on the left side of the tab from the Wordpress dashboard. There next to the words “Media Library” is an “add new” button. Click it and it will open a box which will let you upload media from your computer to the website by clicking on select files. Once uploaded you can click on the media and it will show you various facts about it. A useful one is the file url section. This part tells you where the file is hosted on the website and allows you to add the image in HTML (since this would be the src of the image).
Complete the Task
If you are unable to complete the whole request in one day, add a Work Note detailing what work you performed, and what is left to do, then un-assign yourself from the request so that someone else can work on it the next day.
If and when you are done, make one last Work Note and click the Close Complete button at the bottom of the request.